Basic info

About me
My name is Damián and I am a software developer with a passion for learning new technologies and building innovative solutions. I have experience in both frontend and backend development, and I enjoy working on projects that challenge me to grow my skills. In my free time, I like to explore new programming languages, contribute to open-source projects, and stay up-to-date with the latest trends in the tech industry.
Education
- Thesis: Application for generating test specifications and reports for various levels of ultrasound verification testing (grade A)
- Functional Programming, Metaprogramming, Semantics, Logical Thinking, Parallel Programming
- Thesis: Authenticated encryption mode OCB-AES (grade A)
- Mathematical basics, telecommunications, computer networking and cryptography
Additional education & achievements
Job history
These are relevant long term projects I have been involved in.

Full Stack Engineer
Panaxeo
Working on a global Web application for a major US client in the medical field. The software supports clinical studies and clinical trial data collection worldwide. The project has an international development team and operates in a regulated environment.
Aug 2025 - Present
Full Stack Engineer
Volkswagen Group Services
Designing and implementing an application for interactive visualization of autonomous driving data, enhancing both user engagement and data clarity. Simultaneously developing an admin dashboard for Audi services to manage Azure user data and privileges across internal projects.
Dec 2024 - Aug 2025
.NET Developer
Siemens Healthineers
Began as an intern and advanced to a pivotal position with complete accountability for managing the company's internal web/desktop applications, which are utilized by software engineers for reporting and collecting ultrasound testing data.
Jun 2022 - Dec 2024My tech stack
Some technologies I work/worked with either professionally or in my free time.
Backend
Frontend
Cloud & devops
Databases
Tools & others
Personal projects
These are some of my personal projects that I have worked on in my free time. Please keep in mind all of these are fetched from my GitHub and rendered here
Tech Stack: C# 100.0%
Last Commit: 2/19/2026
Commits: 23
AES Implementation in C#
A simple, educational implementation of the Advanced Encryption Standard (AES) algorithm in C#. This project demonstrates the core AES encryption and decryption processes with a focus on clarity and learning.
Educational Purpose Only: This implementation is intended for learning and educational purposes. Do NOT use this in production environments or for securing sensitive data.
Quick Start
Prerequisites
- .NET 9.0 SDK or later
Supported Features
- ✅ AES-128 encryption and decryption
- ✅ Single block operations (16 bytes)
- ✅ Row-based state representation
- ✅ NIST SP 800-38A test vector compliance
Limitations
- ❌ Only supports 128-bit keys
- ❌ Single block only (no chaining modes like ECB, CBC)
- ❌ No initialization vectors (IV)
- ❌ Not optimized for production use
Performance Benchmarks
Latest benchmark results on Ubuntu 24.04.3 LTS with Intel Core i5-12450H:
| Method | Mean | Error | StdDev | Ratio |
|---|---|---|---|---|
| Custom AES Encrypt | 4,048.8 ns | 74.34 ns | 62.07 ns | ~4.9x |
| Custom AES Decrypt | 7,394.6 ns | 31.49 ns | 29.46 ns | ~8.7x |
| .NET AES Encrypt | 832.0 ns | 3.82 ns | 3.58 ns | 1.0x |
| .NET AES Decrypt | 847.2 ns | 5.56 ns | 4.64 ns | 1.0x |
Testing
The implementation is thoroughly tested against NIST Special Publication 800-38A and FIPS 197 test vectors:
dotnet test --verbosity normal
All tests validate:
- Correct encryption of known plaintext/key pairs
- Proper decryption back to original plaintext
- Compliance with NIST standards
Learning Resources
- NIST SP 800-38A - AES Test Vectors
- FIPS 197 - AES Standard
License
This project is for educational purposes only. Please refer to the license file for details.
Contributing
This is an educational project. Feel free to fork and experiment, but remember this is not intended for production use.
Tech Stack: C# 100.0%
Last Commit: 2/17/2026
Commits: 10
CATBOT Azure HTTP Function with Meta Webhook
This Azure Function project implements a Facebook Messenger bot that automatically sends cute cat photos to users who message your Facebook page. The bot uses Azure HTTP-triggered functions to handle Meta webhooks and respond with adorable cat images.
How It Works
- Users send messages to your Facebook page via Messenger
- Facebook sends webhook events to your Azure Function endpoint
- The function processes the incoming message
- Bot responds automatically with a cute cat photo utilizing free cat api https://developers.thecatapi.com/
Architecture
- HTTP Trigger Function: The azure function receives POST requests from Facebook's webhook system
- Webhook Verification: Validates incoming requests using Facebook's verification token
- Message Processing: Parses incoming message events and user data
- Cat Photo API Integration: Fetches random cat images from external API
- Messenger Send API: Sends cat photos back to users via Facebook's Graph API
Setup Instructions
Prerequisites
- Azure subscription with Function App deployed
- Facebook Developer Account
- Facebook Page for the bot
Facebook Developer Setup
- Create Facebook App: Visit Facebook Developers and create a new app
- Configure Webhooks: Follow the official Facebook Graph API Webhooks Documentation
- Set Webhook URL: Point to your Azure Function HTTP endpoint
- Configure Page Access Token: Generate token for your Facebook page
- Subscribe to Events: Enable
messagesandmessaging_postbacksevents
Azure Function Configuration
-
Deploy Function: Deploy this project to your Azure Function App
-
Environment Variables: Configure the following app settings:
META_PAT: Page access token from FacebookMETA_APP_SECRET: Your webhook verification token (the secret)
-
HTTP Endpoint: Note your function's HTTP trigger URL for webhook configuration
Learn More
Tech Stack: TypeScript 49.9%, C# 42.7%, HCL 4.7%, Dockerfile 1.2%, JavaScript 0.7%, CSS 0.4%, HTML 0.4%
Last Commit: 2/19/2026
Commits: 77
ChoreMaster
A Simple Household Task Management System
Transform your chaotic chore routine into an organized experience!
Technologies Used
- Frontend: React 18 + TypeScript
- Styling: Bootstrap
- Backend: .NET 9
- Database: PostgreSQL with Entity Framework ORM
- Authentication: JWT + OAuth2 (Google)
- Deployment: Azure + Terraform
- Testing: xUnit + .NET Testcontainers
- CI/CD Automation: GitHub Actions
Core Features
- Create, edit, and delete chores
- Manage users (create/edit/delete)
- Delegate chores to specific users
- Mark tasks as completed and reassign them to a user
- View full task history
- Configure custom task time thresholds
- Display relations and time left for each task
Overview of the App
Setting It Up Locally
Backend
Prerequisites
- .NET 9 SDK
- Entity Framework CLI tools
- Docker and Docker Compose
Setup Steps
-
Start PostgreSQL database:
docker-compose up -d -
Create environment file: Create a
.envfile in the backend directory with your connection string:DATABASE_CONNECTION_STRING=your_connection_string_here -
Run Entity Framework migrations:
dotnet ef database update -
Start the backend:
dotnet build
dotnet run
Frontend
Prerequisites
- Node.js (npm version 10.8.2 or higher)
Setup Steps
-
Install dependencies:
npm install -
Start the development server:
npm run devThe app automatically uses
http://localhost:5272/apifor the backend in development.
Production Deployment
Prerequisites
- Azure CLI installed and configured
- Terraform installed
- Docker Hub account
- Azure subscription
GitHub Secrets Configuration
Before deploying to production, configure the following secrets in your GitHub repository (Settings → Secrets and variables → Actions):
| Secret Name | Description |
|---|---|
DOCKERHUB_USERNAME | Your Docker Hub username |
DOCKERHUB_TOKEN | Your Docker Hub access token |
AZURE_CREDENTIALS | Azure service principal credentials (JSON format) |
PRODUCTION_API_URL | Your production API URL (e.g., https://api.yourapp.com) |
Deployment Steps
-
Login to Azure:
az login -
Navigate to the infrastructure directory:
cd infrastructure -
Initialize Terraform:
terraform init -
Review the deployment plan:
terraform plan -
Apply the infrastructure:
terraform apply -
Push to main branch:
Once the infrastructure is set up, pushing to the
mainbranch will trigger the CI/CD pipeline that:- Runs backend tests
- Builds Docker images for frontend and backend
- Pushes images to Docker Hub
- Updates Azure Container Apps with the new images
Tech Stack: C# 100.0%
Last Commit: 4/16/2026
Commits: 46
DjOrm
A lightweight ORM for .NET that maps C# classes to PostgreSQL tables using custom attributes and a generic DbContext<T>.
Features
- Auto-generates
CREATE TABLESQL from annotated C# entities - Junction table generation for entity relationships
- Full CRUD operations via a single generic context
- Translates simple LINQ expressions into SQL
WHEREclauses - Recursive fetching of related objects via junction tables
- Async throughout
Usage
1. Annotate your entities
[TableAttribute]
public class CarEntity
{
    [PrimaryKeyAttribute]
    public int Id { get; set; }
    public string Name { get; set; }
    public string Make { get; set; }

    [SecondaryKeyAttribute]
    public DriverEntity? Driver { get; set; }
}
2. Create tables and run queries
var db = new DatabaseConnector(connString);

// Auto-create tables from entity definitions
var entities = new TableEntitiesMaker(new TypeTranslator()).CreateObjectEntities();
await db.ExecuteCommands(new SqlCreateTablesTranslator(entities).TranslateEntitiesToCreateTables());

// CRUD
IDbContext<CarEntity> ctx = new DbContext<CarEntity>(db);

await ctx.InsertData(new CarEntity("Civic", "Honda", driver));
var all    = await ctx.GetData();
var hondas = await ctx.GetDataBy(x => x.Make == "Honda" && x.Name != "Accord");
await ctx.UpdateData(car);
await ctx.DeleteData(car);
LINQ expression support — GetDataBy walks the expression tree and translates binary expressions (==, !=, <, <=, >, >=, &&, ||) directly into parameterized SQL conditions.
3. Recursive fetching of related objects
Pass recursive: true (or isRecursive: true on DbContext) to automatically load related entities via their junction tables:
// Fetch all articles and populate their related TagEntity objects
var articles = await ctx.GetData(isRecursive: true);

// Same with a filter
var articles = await ctx.GetDataBy(x => x.Title == "Hello", isRecursive: true);
For each fetched object, DjOrm:
- Queries the junction table (
{ParentType}{RelatedType}) using the parent's primary key. - Looks up the related entity by its primary key.
- Assigns the result to the
[SecondaryKey]-annotated property.
This works recursively — related objects that themselves have [SecondaryKey] properties are also populated.
Configuration
Connection string is loaded from a .env file:
HOST=localhost
PORT=5432
USERNAME=postgres
PASSWORD=postgres
DATABASE=testdb
Tech Stack: TypeScript 89.9%, CSS 8.6%, JavaScript 1.4%
Last Commit: 3/9/2026
Commits: 37
Intermezzo Staff
A staff management and time-tracking web app for small businesses — built to track daily work inputs, cash flow, and shift schedules. Built for a small cafe in my home city.
Tech Stack
| Layer | Technology |
|---|---|
| Framework | Next.js 16 (App Router) + React 19 + TypeScript |
| Auth | NextAuth v5 — Google OAuth |
| Database | MongoDB (Atlas) |
| UI | React Bootstrap 5 + Custom CSS Modules |
| Calendar | FullCalendar (day/week/month views) |
| Utilities | date-fns, react-spinners |
| Hosting | Vercel-ready (Next.js server actions) |
Role-Based Access
Access is controlled via environment-level email whitelists:
- Standard users — can view and edit their own data only; edit window limited to current month + last 2 days
- Admin users — elevated privileges: view all employees' data, filter by employee, access full wallet history
Authentication is handled through Google OAuth — only whitelisted emails can log in.
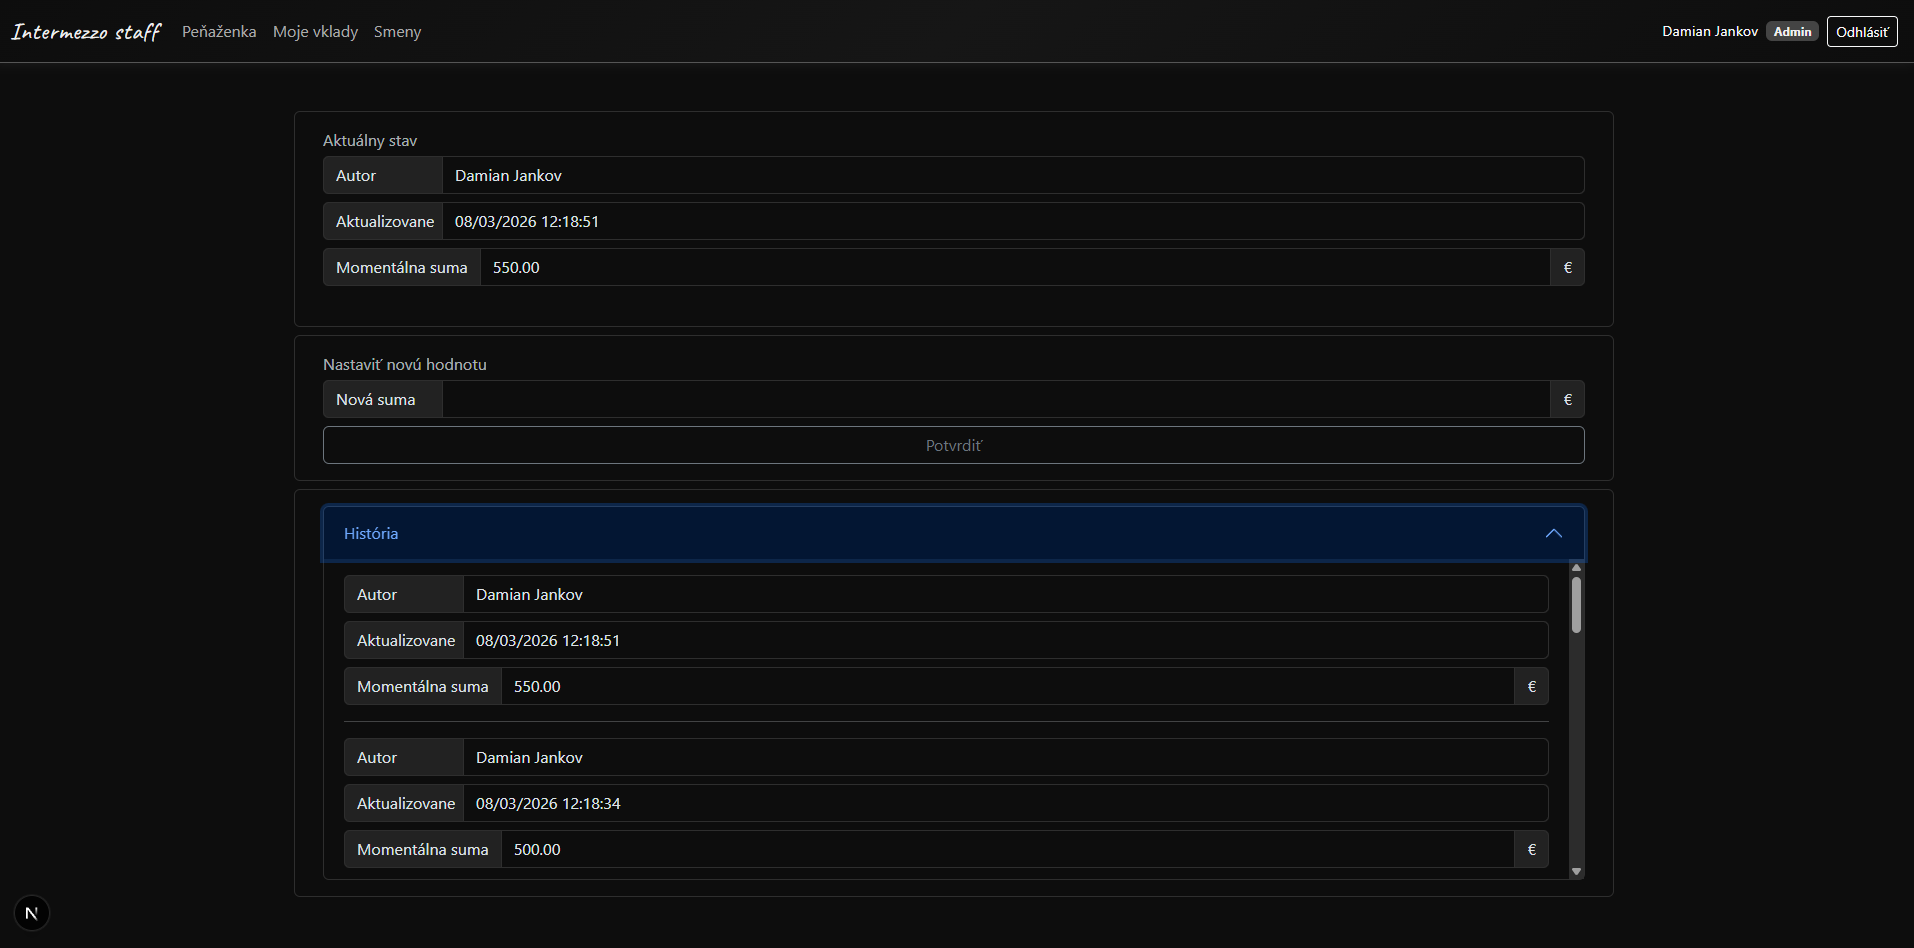
Pages
Wallet /wallet
Tracks the business cash balance. Users can submit balance updates with a timestamp. Admins see the full history of all updates (shown in the História accordion); standard users see the current balance only.
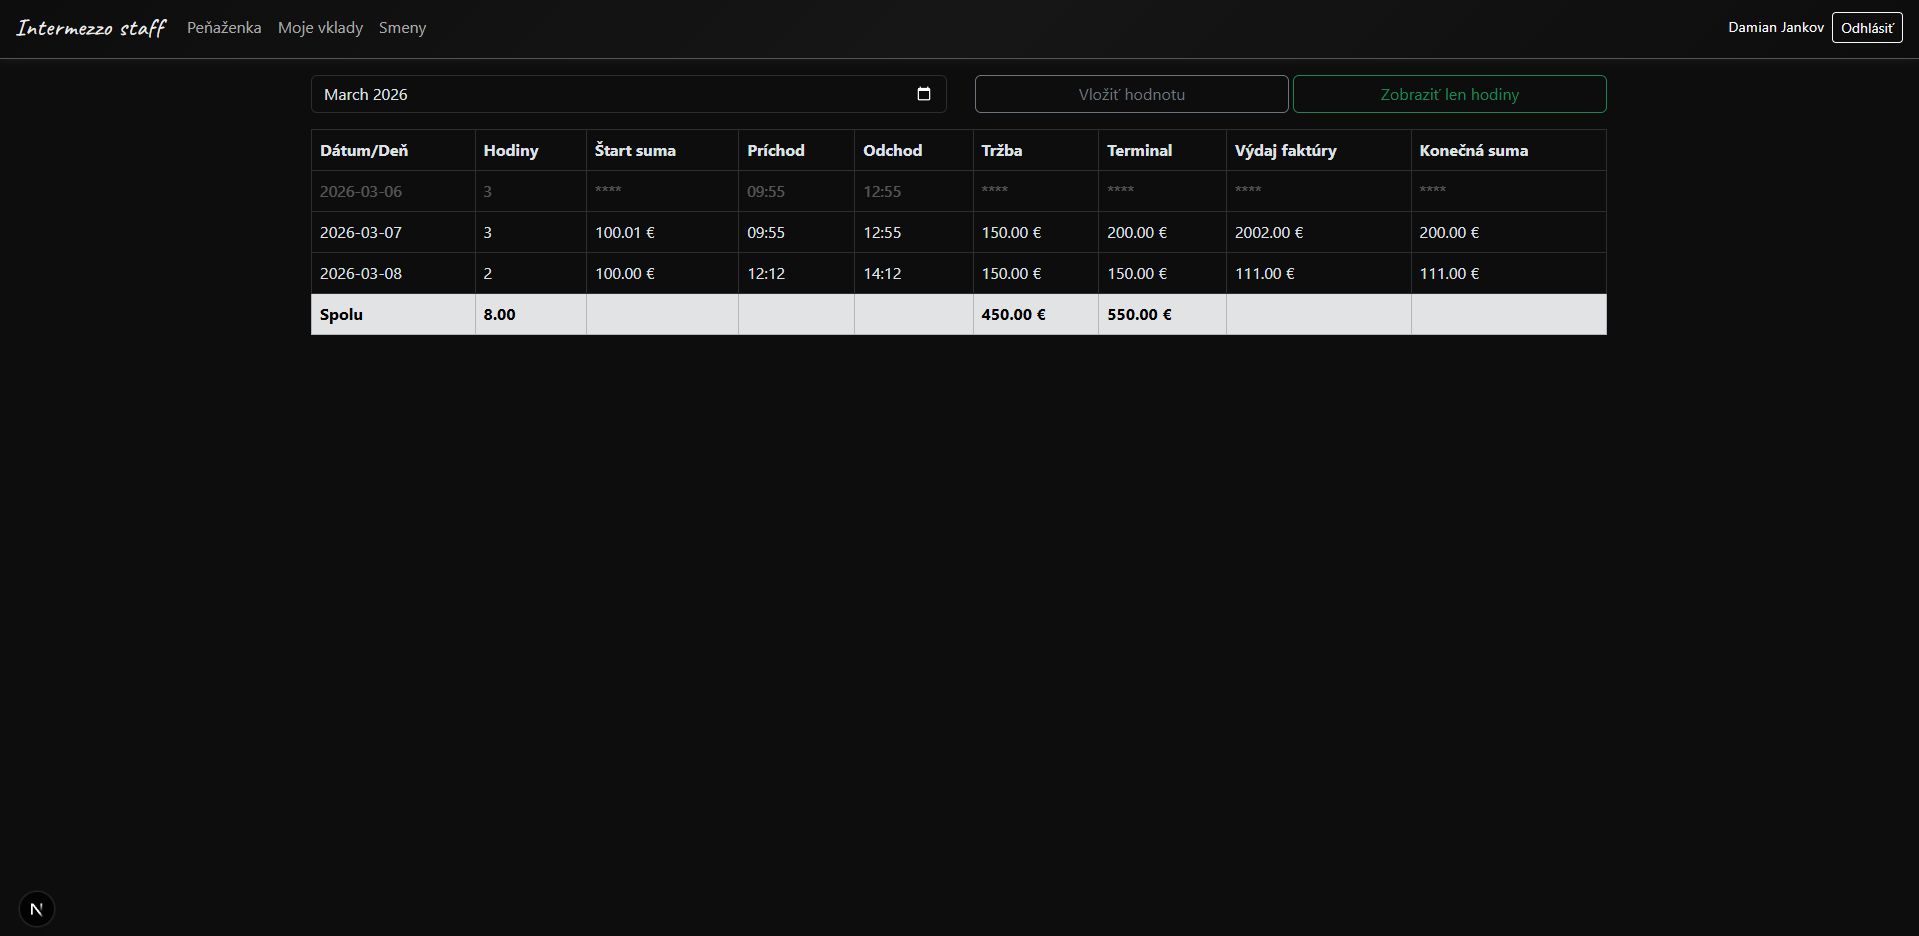
My Inputs /myinputs
Daily work log table. Each entry records hours worked, start/end times (auto-calculates hours), cash and terminal turnover, day expenses, and start/end float amounts. Filterable by month. Admins can view entries for all staff. Older entries outside the edit window are masked with ****.
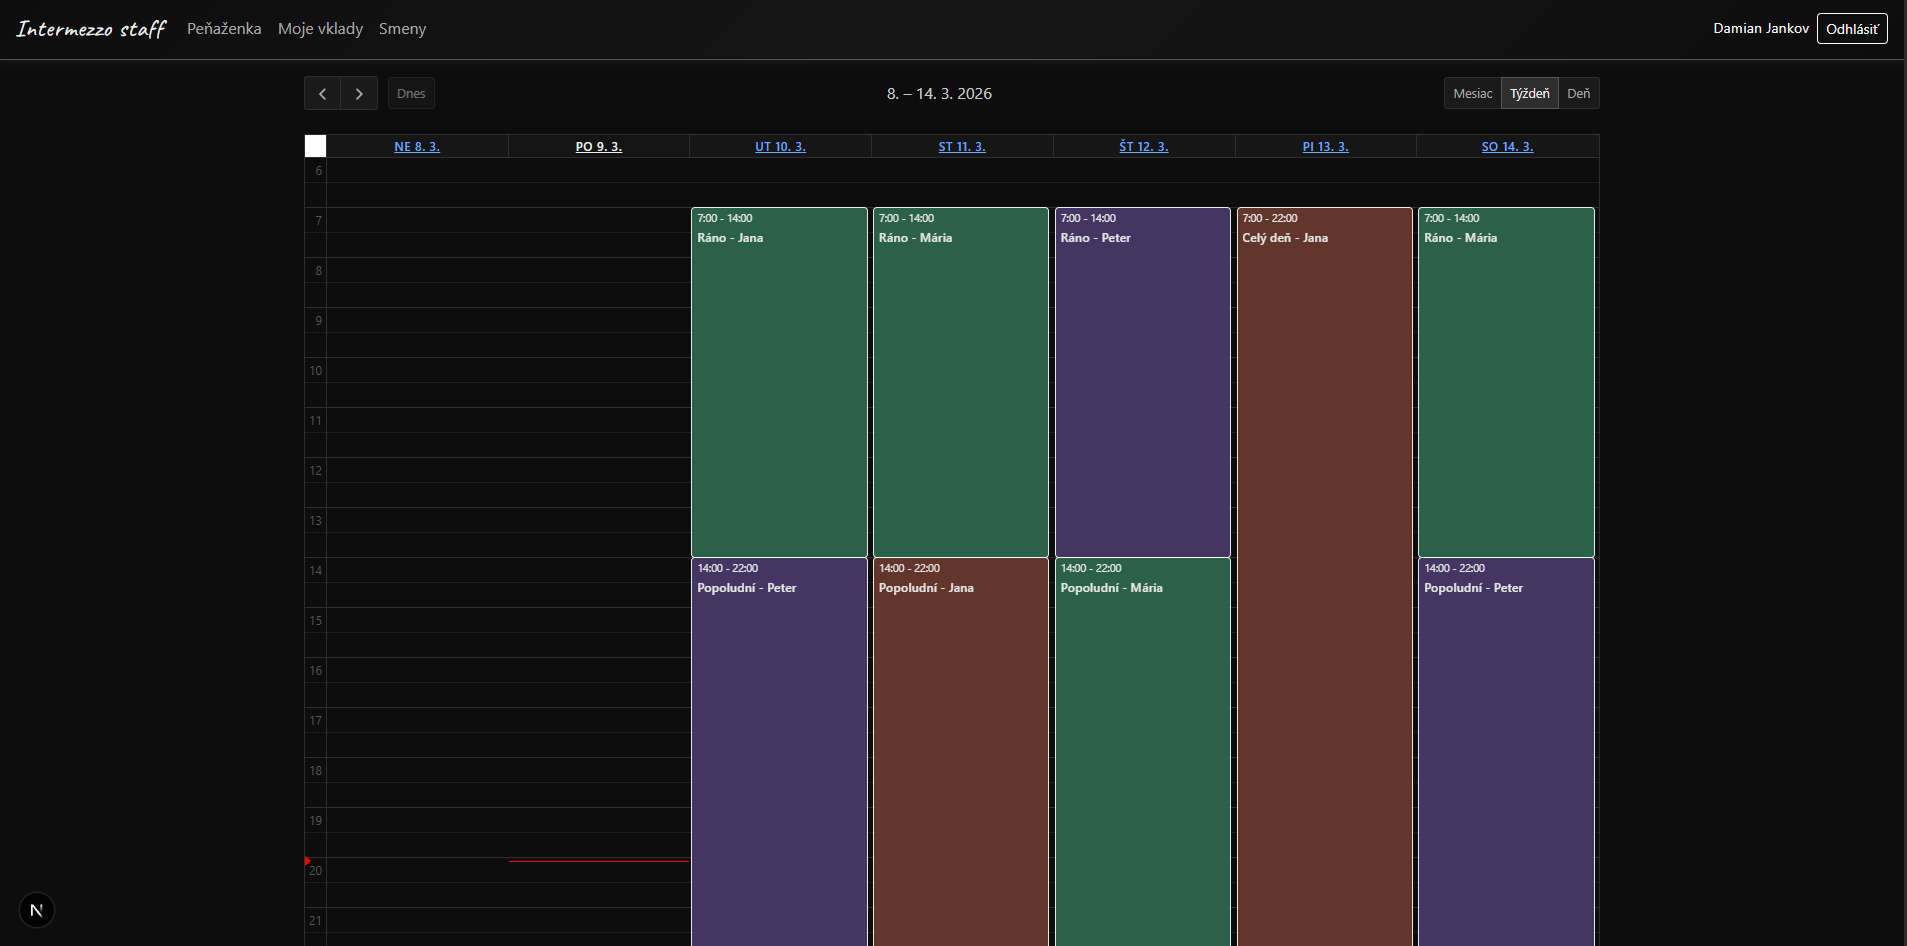
Timetable /timetable
A color-coded shift calendar showing staff schedules. Powered by FullCalendar with day, week, and month views. Each employee is assigned a distinct color.
Tech Stack: TypeScript 92.6%, CSS 3.8%, JavaScript 3.5%, Shell 0.1%
Last Commit: 4/12/2026
Commits: 88
Life Organizer
A personal productivity application built with Next.js 14, featuring task management, work reports, and workout tracking. The app uses Google OAuth for authentication and MongoDB for data persistence.
Tech Stack
- Framework: Next.js 14 (App Router)
- Authentication: NextAuth.js with Google OAuth
- Database: MongoDB
- UI: React Bootstrap
- Language: TypeScript
- Deployment: Vercel free tier + Atlas
Home (/)
- Landing page showing welcome message for authenticated users
- Displays access denied message for unauthenticated users
Tasks (/tasks)
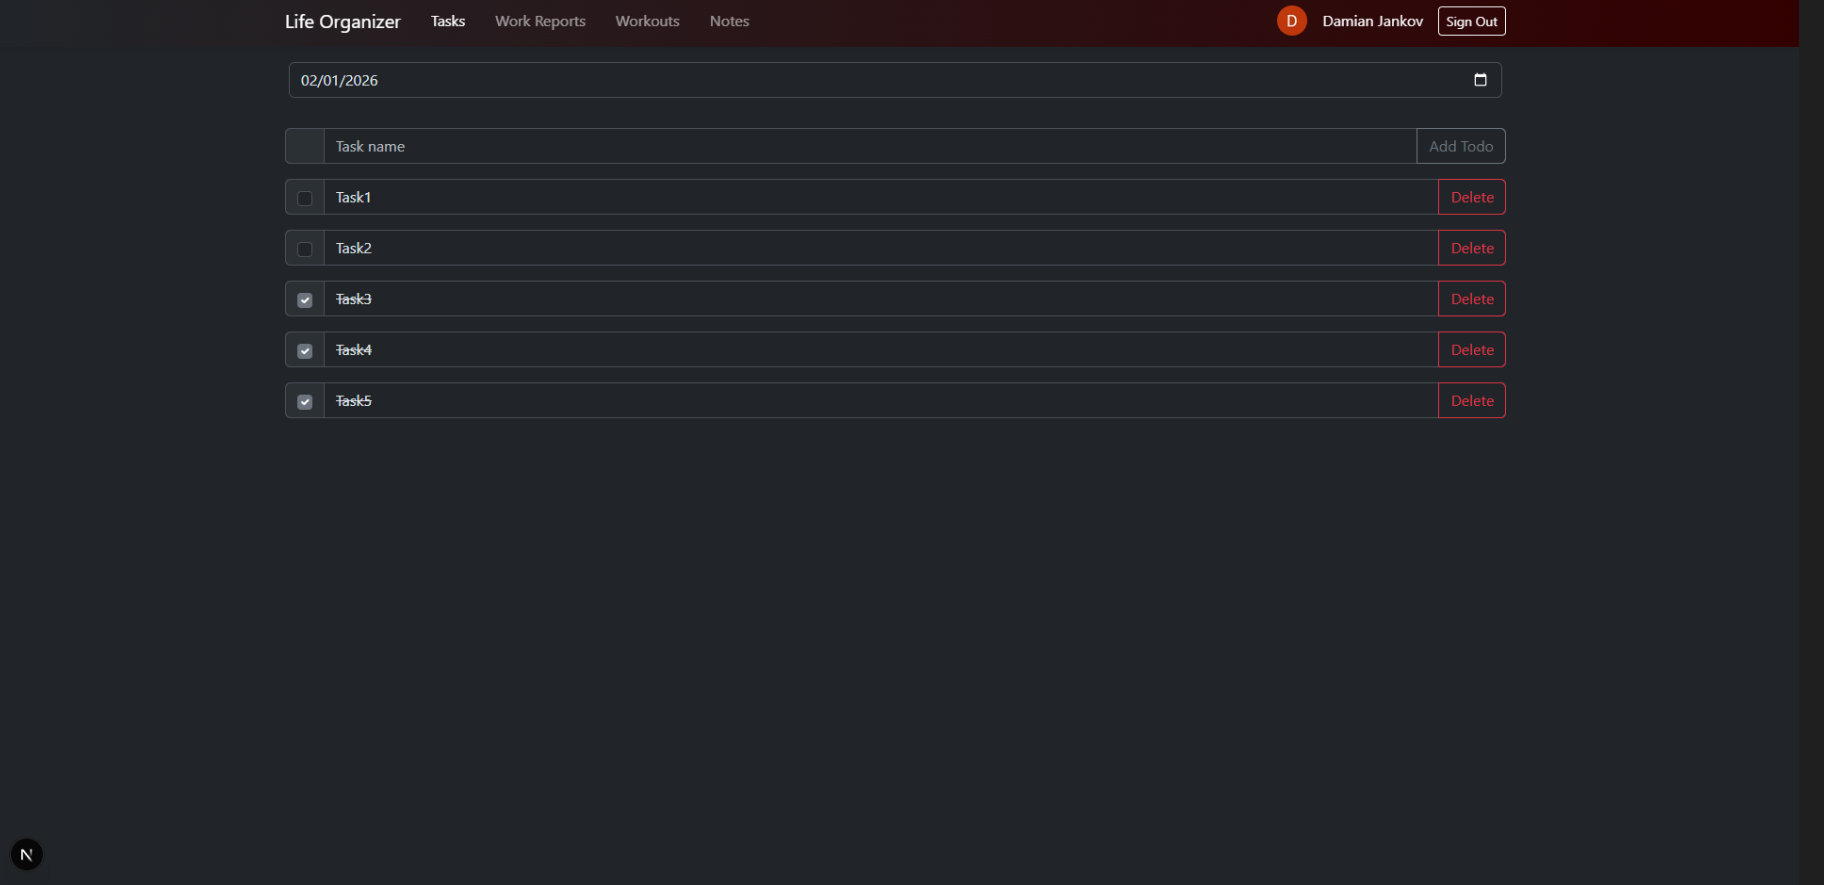
- Daily task management system
- Date-based task organization
- Create, update, and toggle task completion
- Tasks persist per date in MongoDB
Work Reports (/workreports)
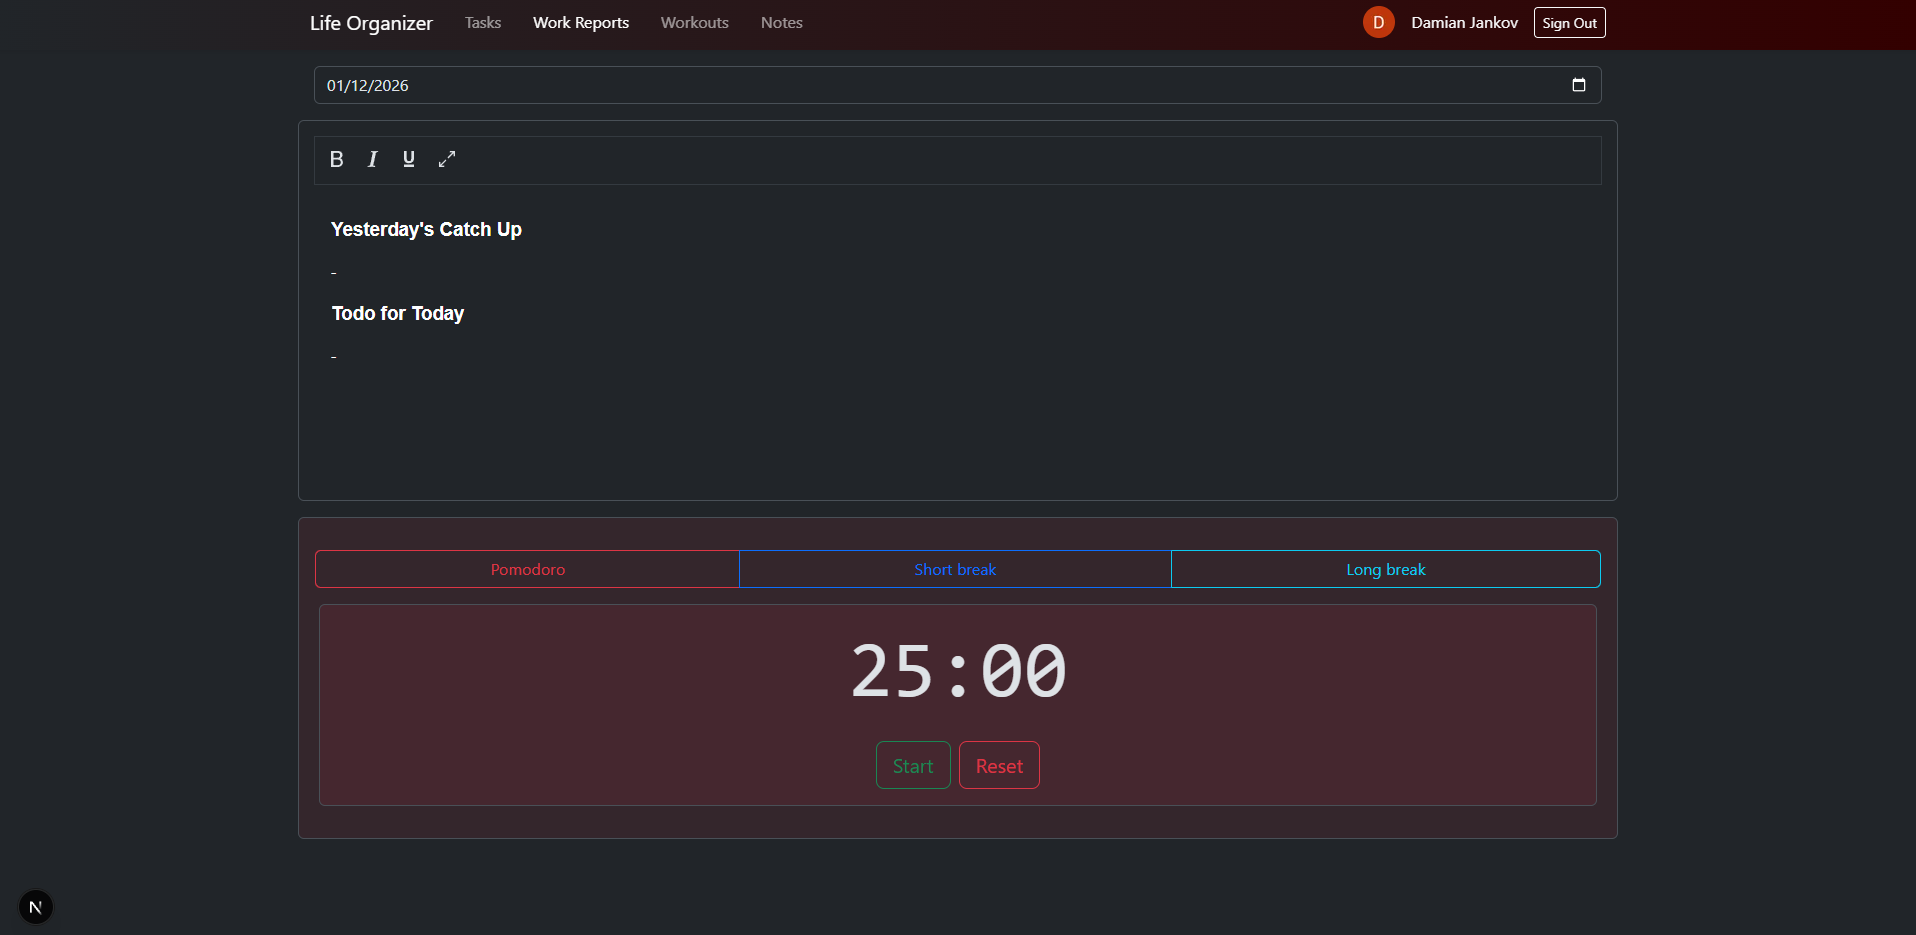
- Daily work report editor
- Rich text editor with formatting options
- Date-based report management
- Integrated Pomodoro timer for time management
- Create and update reports for specific dates
Workouts (/workouts)
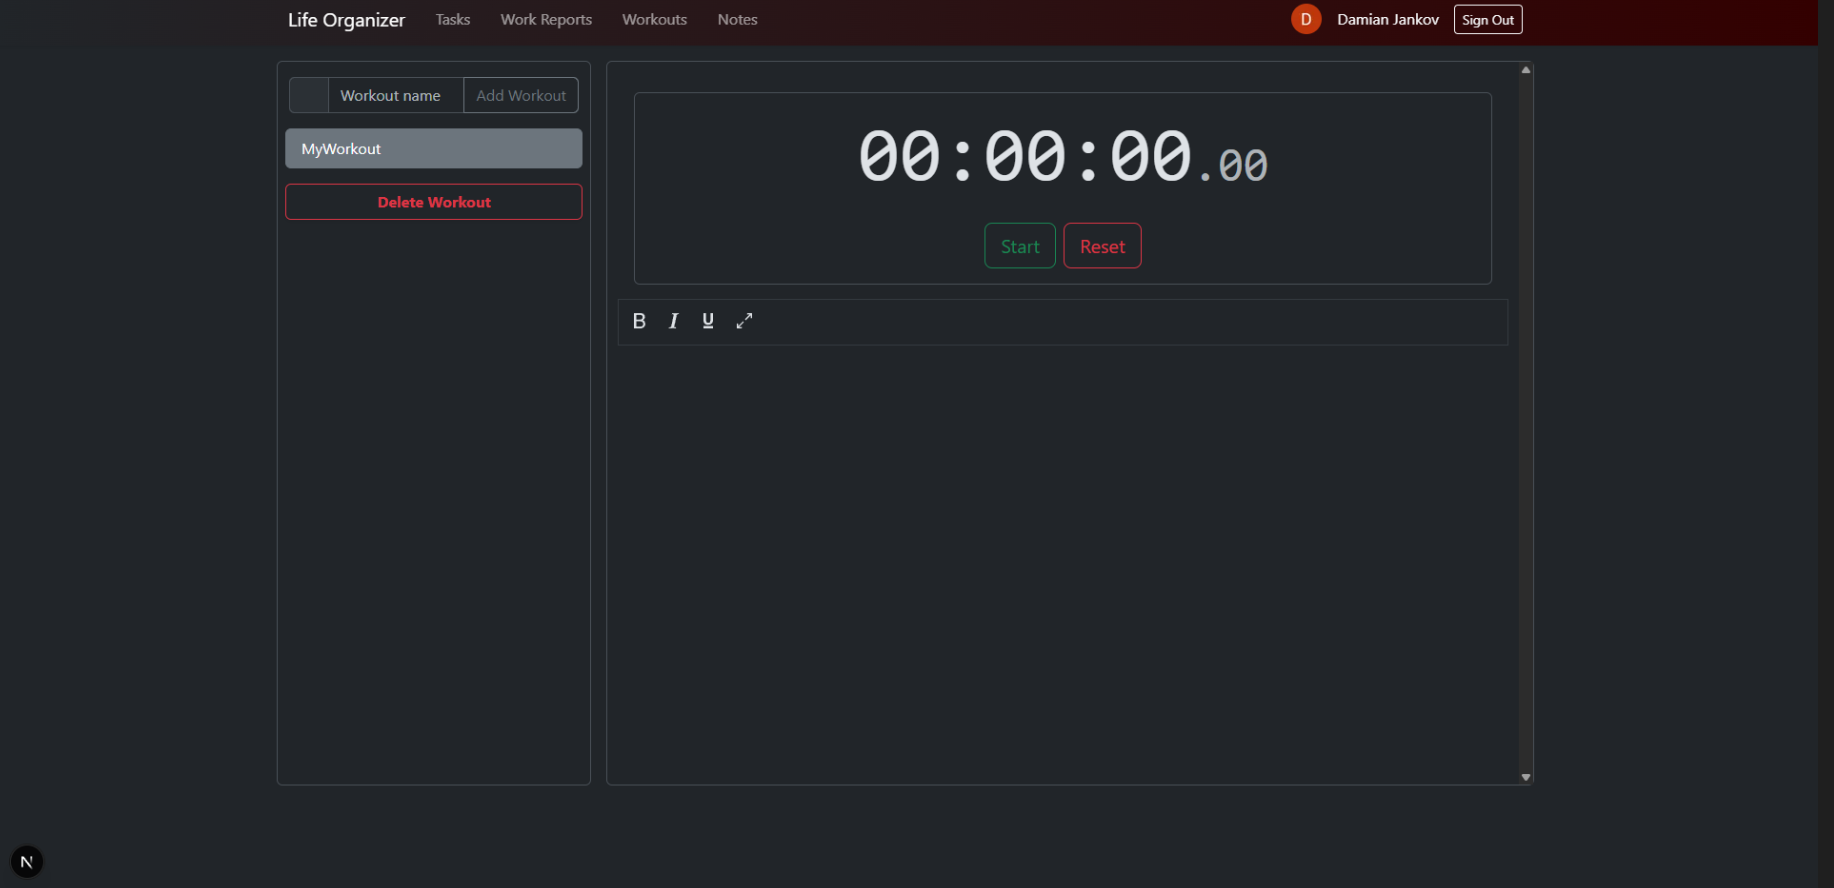
- Workout tracking and management
- Built-in stopwatch timer
- Rich text editor for workout details
- Add, edit, and delete workout entries
- View workout history
Notes (/notes)
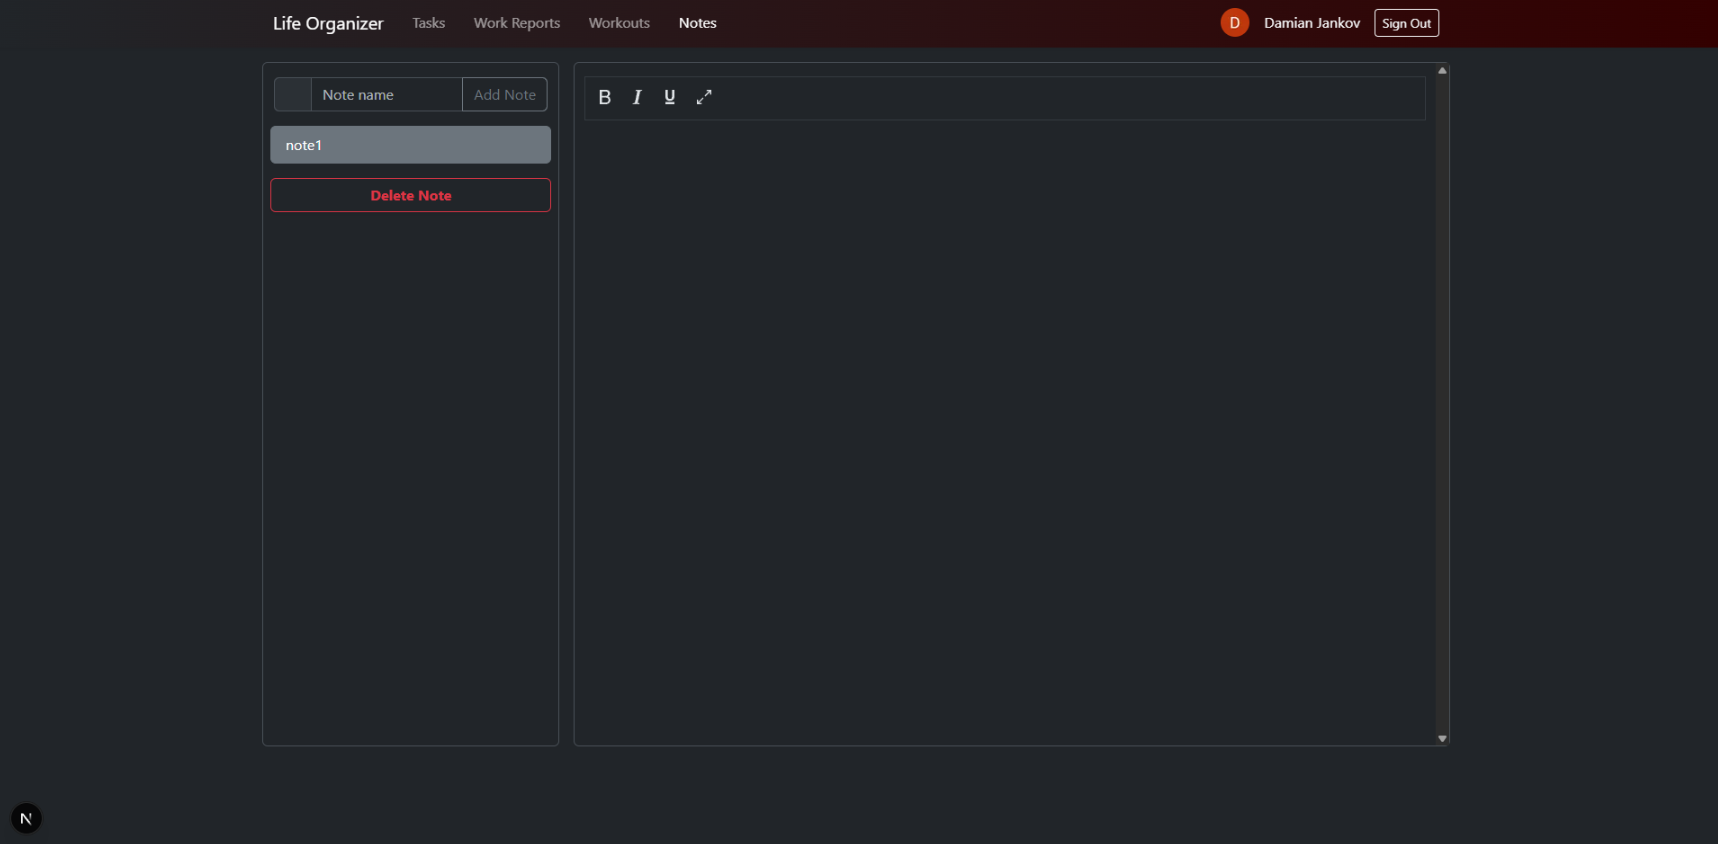
- Note tracking and management
- Rich text editor for note details
- Add, edit, and delete note entries
Tech Stack: C# 100.0%
Last Commit: 2/17/2026
Commits: 8
Mandelbrot Set Visualizer
A desktop application for rendering and exploring the Mandelbrot set, built with C# and Avalonia UI targeting .NET 9.

About
The Mandelbrot set is one of the most famous fractals in mathematics. A point in the complex plane belongs to the set if the sequence defined by:
remains bounded (does not diverge to infinity). This application renders the set on a 1000×1000 pixel canvas, coloring points that belong to the set in red.
Features
- Real-time rendering of the Mandelbrot set
- Pan navigation using arrow keys to explore different regions
- Zoom in by pressing
Spaceto increase magnification - Adaptive iteration count — the maximum number of iterations automatically increases as you zoom deeper, improving detail at higher magnifications
Controls
| Key | Action |
|---|---|
Arrow Up | Pan up |
Arrow Down | Pan down |
Arrow Left | Pan left |
Arrow Right | Pan right |
Space | Zoom in |
Performance Note
You can scroll (zoom) into the set to explore its infinitely complex boundary, but be aware that performance degrades significantly after a few zoom levels. The rendering is not heavily optimized — each zoom step requires recalculating every pixel on the canvas, and as the iteration count increases with deeper zoom levels, the computation becomes substantially more expensive. This is a known limitation of the current implementation and would require significant optimization (e.g., multithreading, GPU acceleration, or perturbation theory) to handle deep zooms smoothly.
Getting Started
Prerequisites
Run
cd MandelBrot/MandelbrotApp
dotnet run
Tech Stack
- C# / .NET 9
- Avalonia UI 11.3 — cross-platform UI framework
- WriteableBitmap — pixel-level rendering
Tech Stack: C# 100.0%
Last Commit: 2/19/2026
Commits: 11
PriceChecker
A .NET tool that monitors product prices on the web and notifies you by email when your target price is hit.
How It Works
- Define items to track in
InputConfig.xml— each entry has a URL, a target price, and a regex to extract the current price. - The tool fetches each page, parses the price, and compares it to your goal.
- Every 30 minutes, it sends an email summary via Mailjet SMTP showing actual vs. target prices and whether each goal was reached.
Configuration
<root>
    <Recipient>you@example.com</Recipient>
    <ItemWebResource>
        <url>https://example.com/product</url>
        <priceGoal>49.99</priceGoal>
        <regexPricePattern>price-regex</regexPricePattern>
    </ItemWebResource>
</root>
Setup
Set your Mailjet SMTP keys as environment variables:
PUBLIC_KEY_PARSERTOOL=<your-public-key>
PRIVATE_KEY_PARSERTOOL=<your-private-key>
Then run:
dotnet run --project PriceChecker
Tech Stack: C# 96.6%, Shell 3.4%
Last Commit: 2/19/2026
Commits: 25
RAG (Retrieval-Augmented Generation) - C# Implementation
A C# implementation of a Retrieval-Augmented Generation (RAG) system that processes PDF documents and enables intelligent question-answering using local AI models.
Overview
This RAG implementation allows you to ask questions about PDF documents by combining semantic search with large language models. The system extracts text from PDFs, converts it into semantic vectors, stores them in a vector database, and retrieves relevant context to generate accurate answers.
Architecture
The system uses the following components:
- Qdrant: Vector database for storing and searching semantic embeddings
- Ollama with Phi3 model: Local LLM for generating embeddings and completions
- PdfPig: PDF text extraction library
- .NET 9.0: Runtime environment
How It Works
- PDF Processing: Extract text content from PDF documents
- Text Chunking: Split the text into manageable chunks
- Overlay Chunking: Create overlapping chunks to maintain context continuity
- Semantic Vectorization: Convert each chunk into semantic vectors using Ollama's Phi3 model
- Vector Storage: Store all vectors in Qdrant vector database
- Query Processing: Convert user queries into semantic vectors
- Similarity Search: Use Qdrant to find the most relevant chunks via semantic search
- Context Augmentation: Compose a final prompt with retrieved context
- Answer Generation: Generate accurate answers using the LLM with relevant context
Prerequisites
- Docker with GPU passthrough support enabled
- NVIDIA GPU (required for Ollama to run efficiently)
- .NET 9.0 SDK or later
Docker GPU Setup
Ensure Docker has access to your GPU. You need:
- NVIDIA Container Toolkit installed
- Docker configured with
--gpus=allflag support
Tech Stack: JavaScript 57.7%, C# 40.5%, CSS 0.8%, Dockerfile 0.7%, HTML 0.3%
Last Commit: 2/18/2026
Commits: 162
RSTracker
RSTracker helps coaching staff make data-driven decisions about player load management. By tracking daily RPE (Rating of Perceived Exertion) and wellness scores across a squad, the application calculates key performance indicators such as training load volume, intensity, and the Acute:Chronic Workload Ratio (ACWR) -- a widely recognized metric for assessing injury risk.
The platform is designed around the concept of league weeks (7-day windows), allowing staff to review and compare data on a week-by-week basis aligned with the competitive schedule.
Key Features
Player Management
- Maintain a full squad roster with player profiles (name, age, position, weight, height)
- Add and remove players with cascading data cleanup
RPE Tracking
- Record daily session RPE values and training duration per player
- Automatic calculation of session training load (RPE x duration)
- Daily team averages, volume percentages, and intensity metrics
- Comparison against built-in reference norms for each day of the week
Wellness Monitoring
- Track four daily wellness dimensions per player: Muscle Status, Recovery Status, Stress, and Sleep
- Each dimension scored on a 1-7 scale (total wellness score out of 28)
- Mid-week recovery assessment via Wednesday-Thursday-Friday averages
ACWR Analysis
- Acute:Chronic Workload Ratio calculation over configurable time windows
- Multi-week trend visualization to identify periods of elevated injury risk
- Combined volume and intensity breakdown per week
Data Visualization
- Bar charts for daily wellness and RPE summaries
- Combo charts comparing actual RPE loads against daily reference norms
- Stacked bar charts for weekly RPE breakdowns across the ACWR period
- ACWR ratio trend charts spanning multiple weeks
Weekly Data Views
- Day-by-day tables showing individual player values alongside team averages
- Week summary tables with aggregated statistics
- Date picker navigation to browse historical data by league week
Screenshots
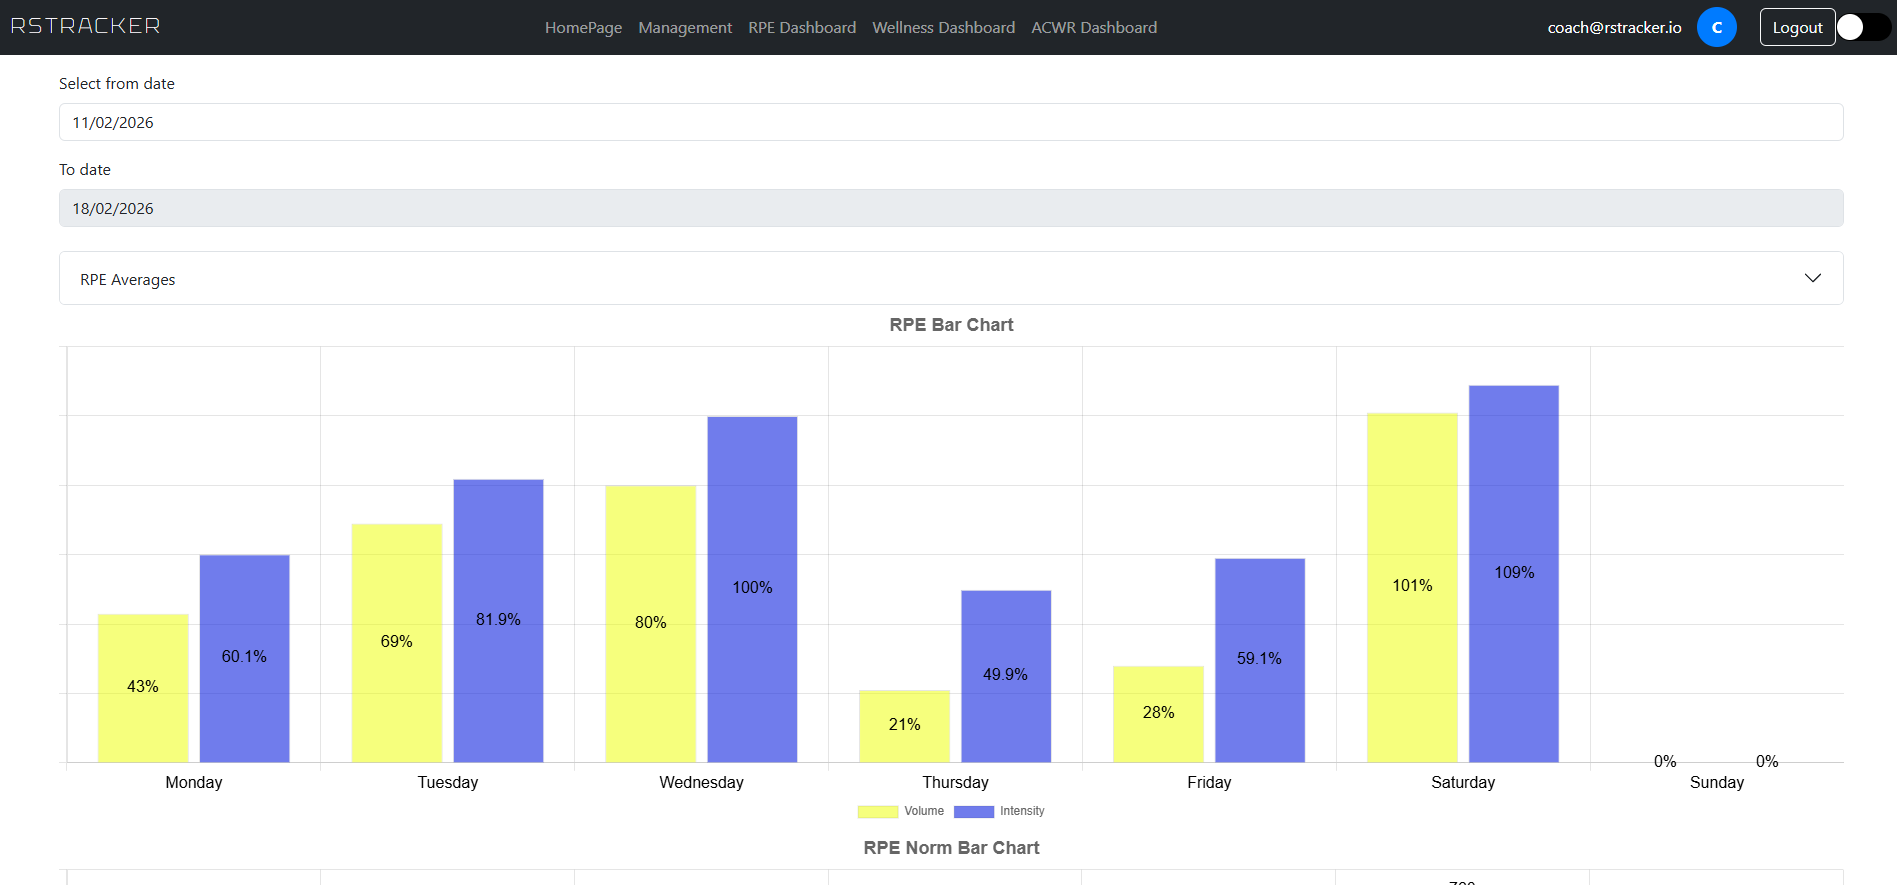 RPE Bar Chart -- daily training load visualization
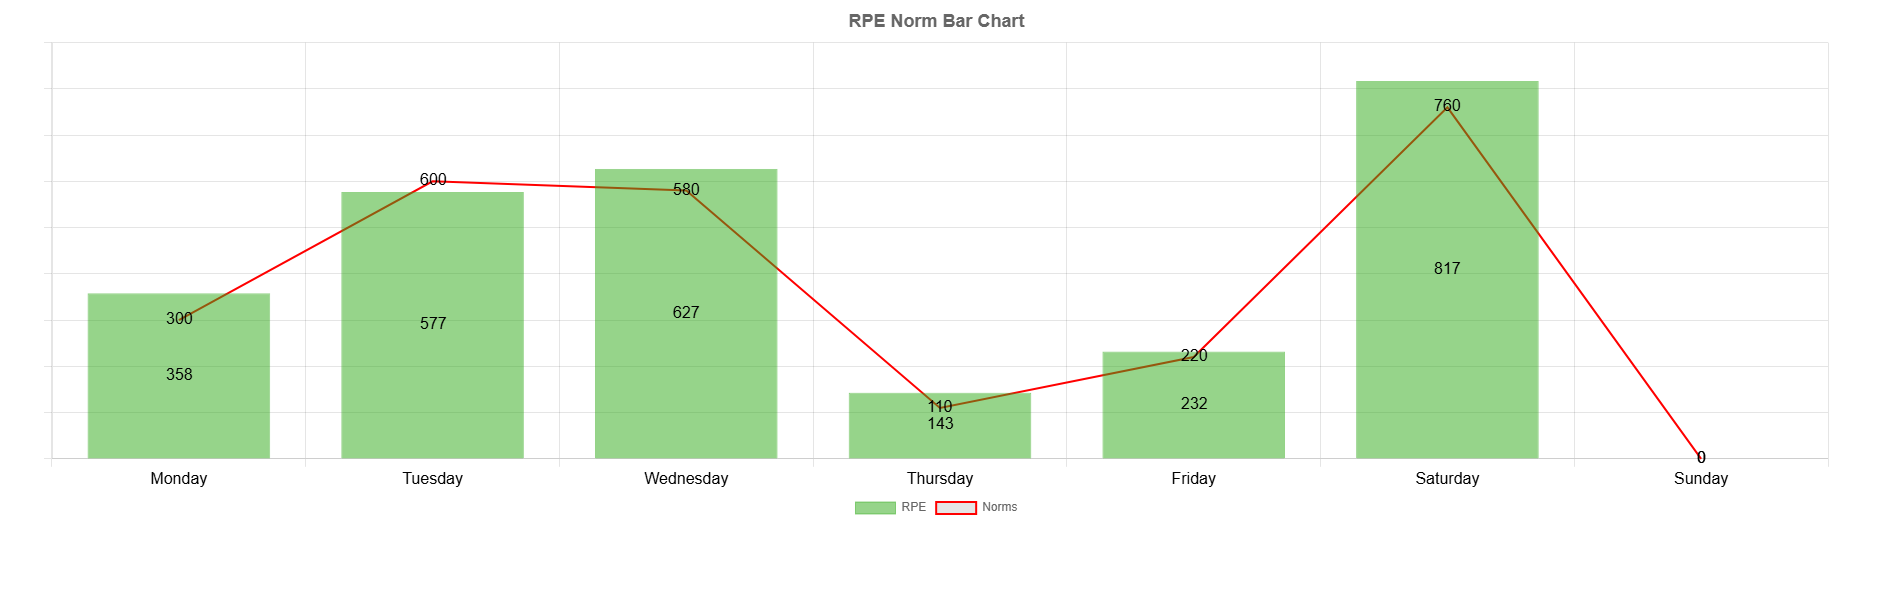 RPE Norm Chart -- actual loads compared against daily reference norms
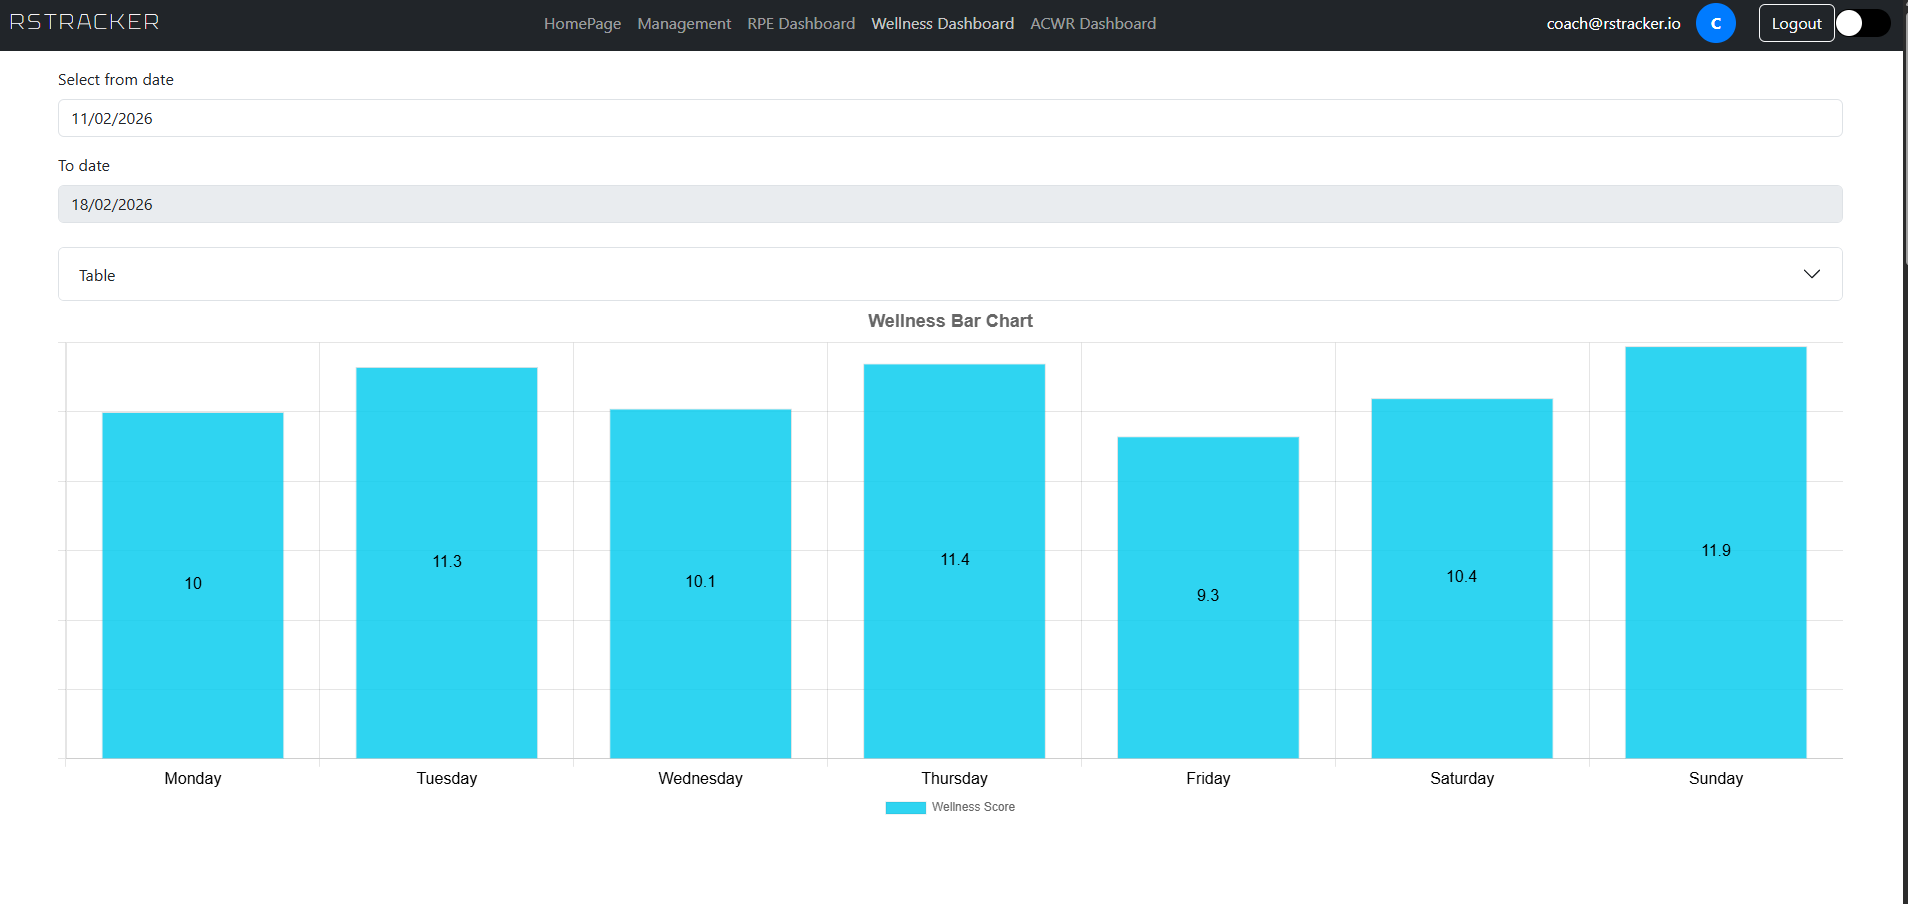 Wellness Chart -- daily wellness score overview
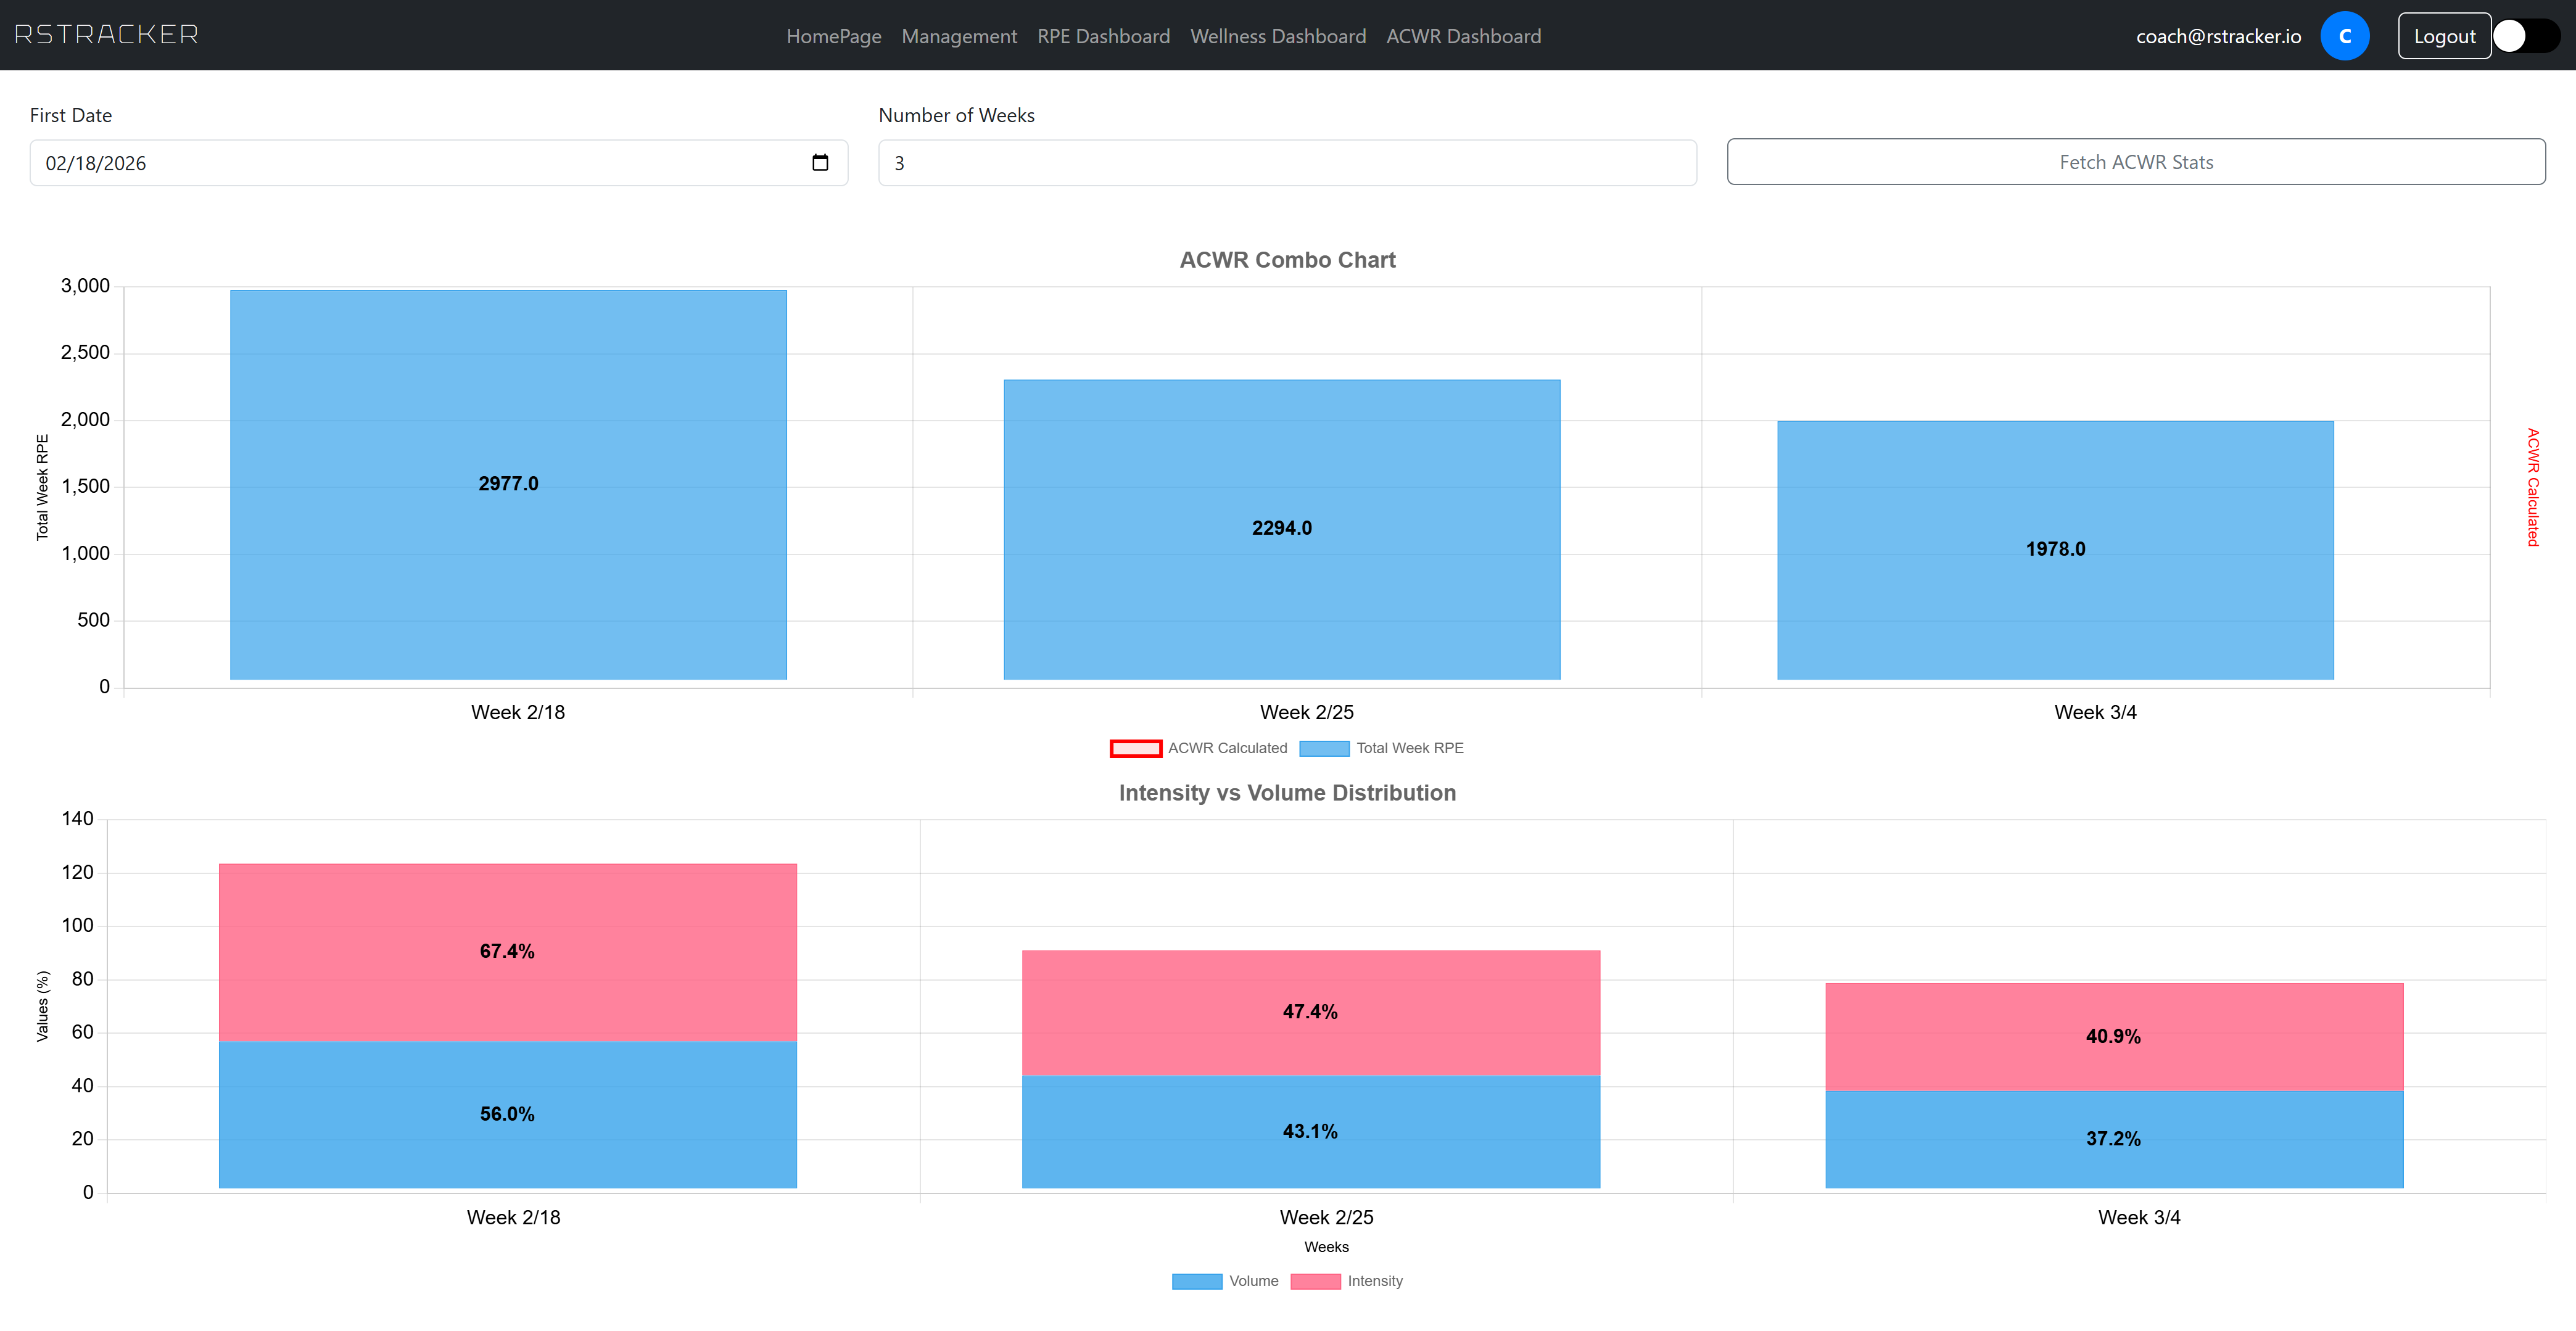 ACWR Analysis -- workload ratio trends across multiple weeks
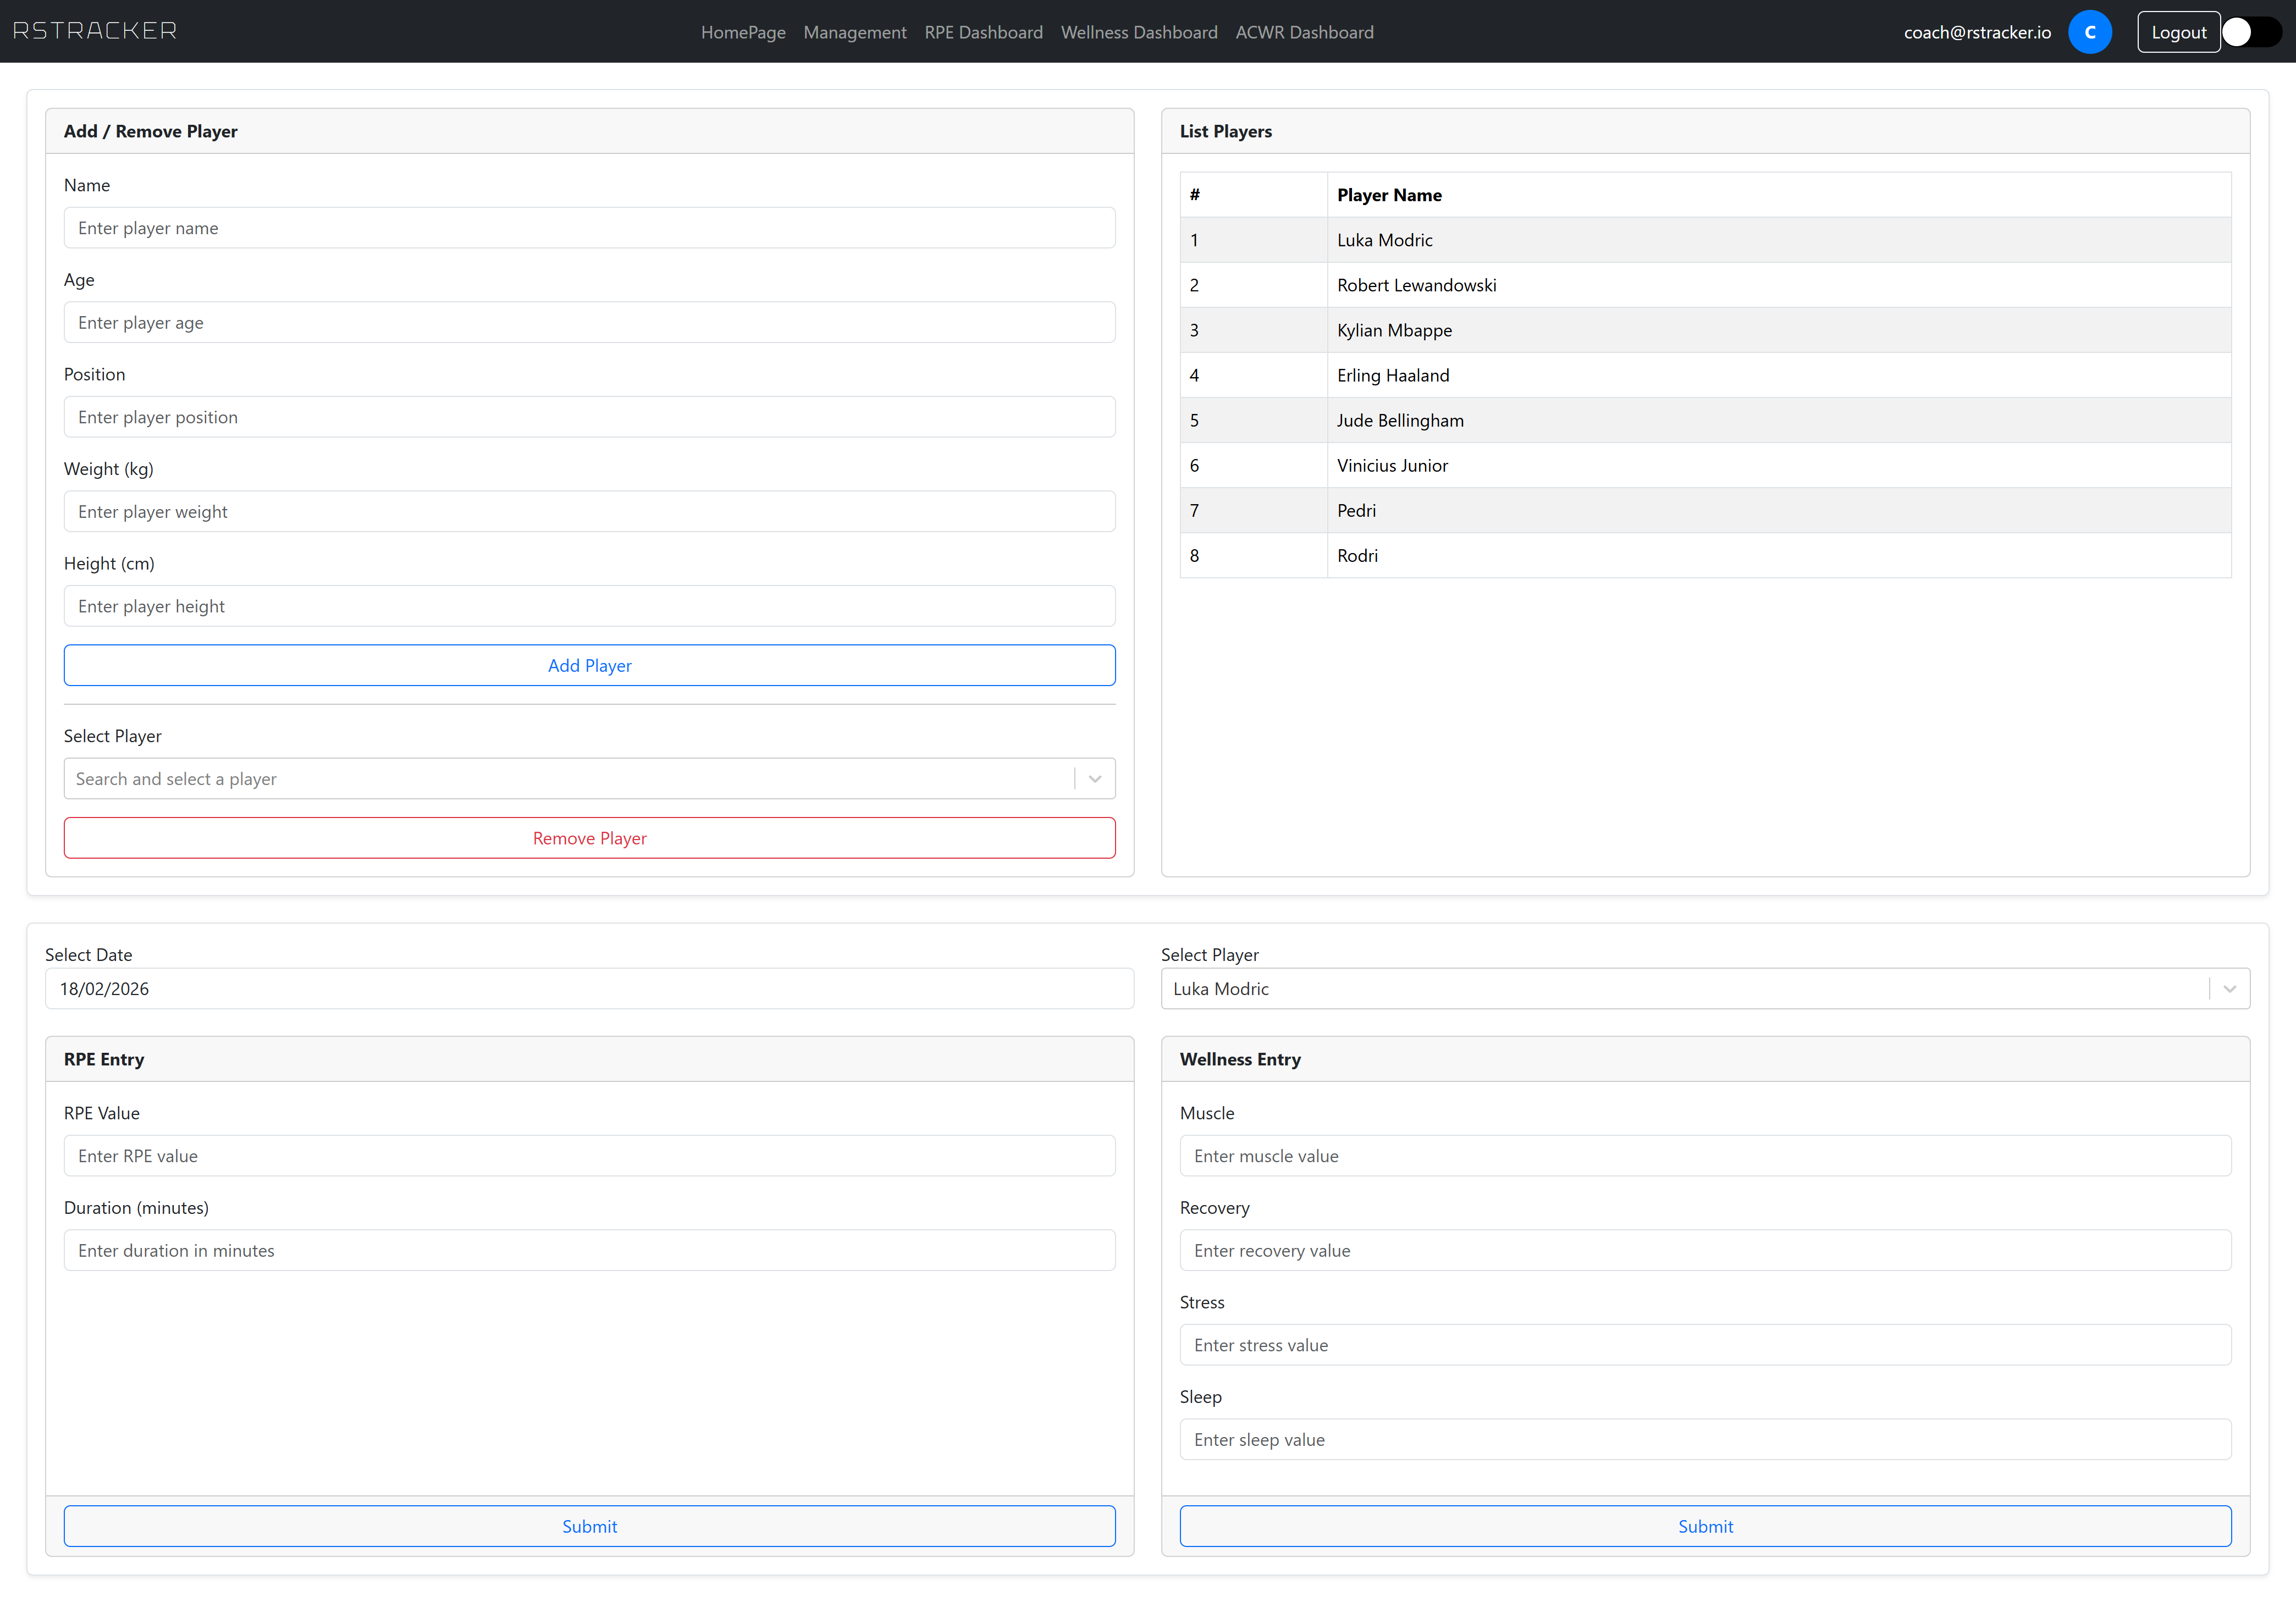 Player Management -- squad roster administration
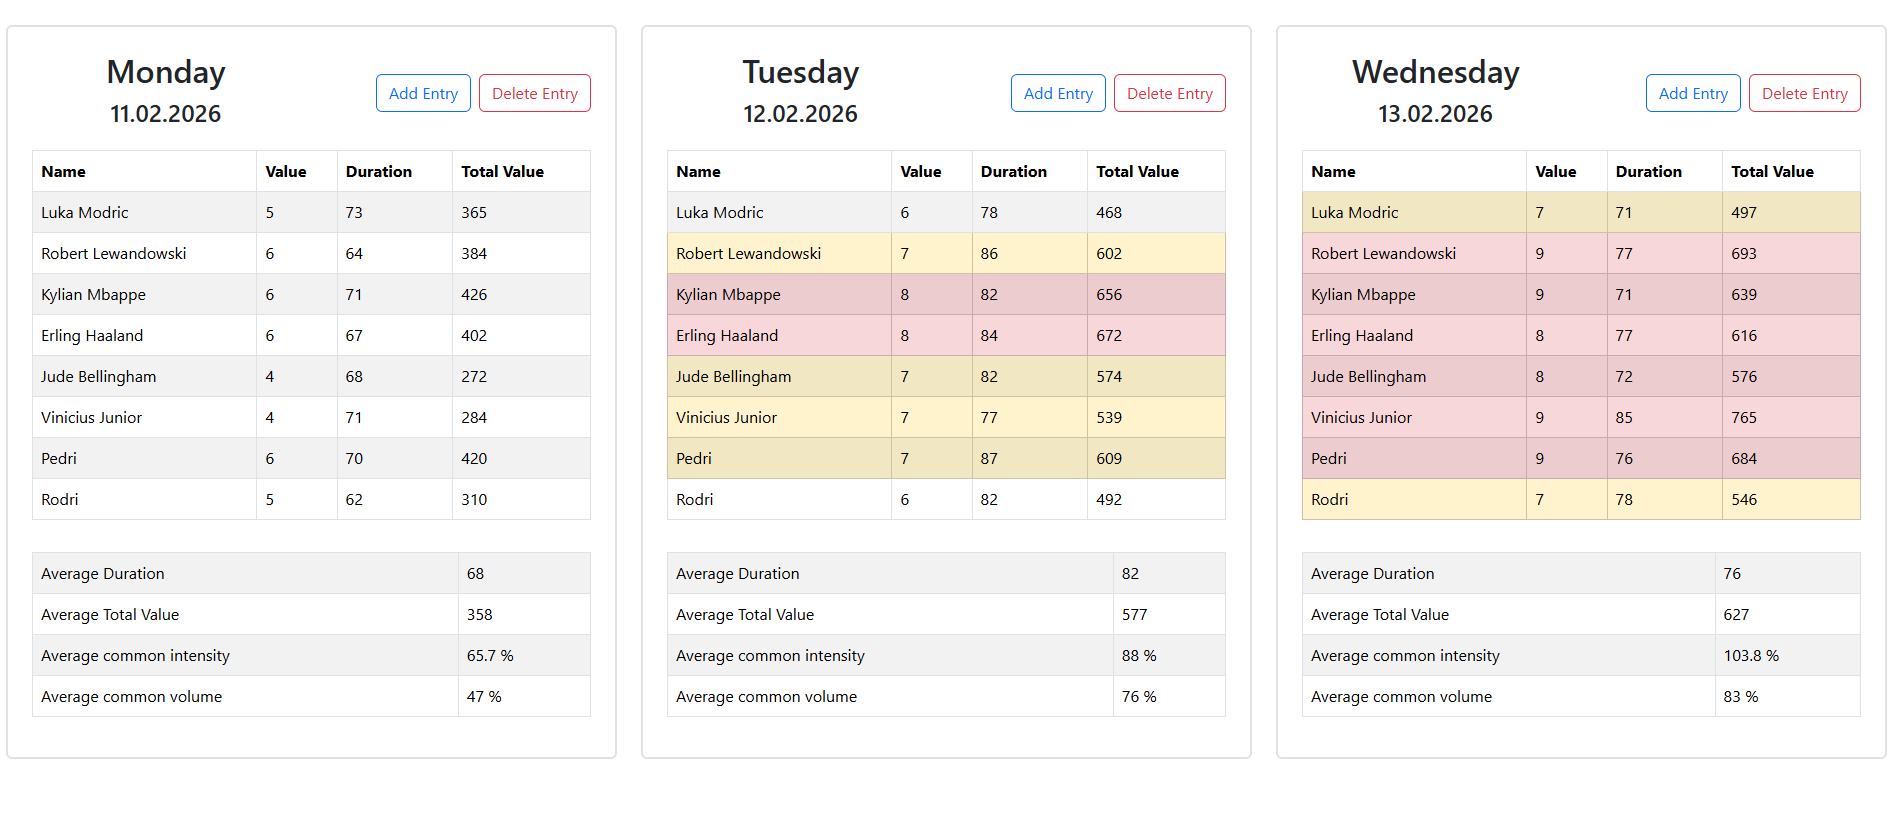 Player Data, RPE, Wellness and Management -- combined data entry view
Sports Science Background
RPE (Rating of Perceived Exertion)
RPE is a subjective measure of how hard a player perceives a training session to be. When combined with session duration, it produces the session RPE or total training load:
Volume and Intensity
- Volume is expressed as a percentage of the maximum expected daily load (baseline of 760):
- Intensity normalizes volume by time to account for differences in session length:
Wellness Scoring
Players self-report four metrics daily, each on a 1-7 scale:
| Metric | Description |
|---|---|
| Muscle Status | Perceived muscle soreness and readiness |
| Recovery Status | General sense of physical recovery |
| Stress | Mental and emotional stress levels |
| Sleep | Sleep quality and duration |
The total wellness score ranges from 4 to 28. The platform also calculates a Wednesday-Thursday-Friday average, commonly used to assess recovery state heading into match day.
ACWR (Acute:Chronic Workload Ratio)
The ACWR compares the current week's training load against the rolling average of the previous four weeks:
| ACWR Range | Interpretation |
|---|---|
| Below 0.8 | Undertraining -- potential detraining risk |
| 0.8 - 1.3 | Safe zone -- optimal load management |
| 1.3 - 1.5 | Caution -- elevated injury risk |
| Above 1.5 | Danger zone -- high injury risk |
Daily Reference Norms
The system includes built-in daily RPE norms for a typical training week to compare against actual loads:
| Day | Mon | Tue | Wed | Thu | Fri | Sat | Sun |
|---|---|---|---|---|---|---|---|
| Reference RPE | 300 | 600 | 580 | 110 | 220 | 760 | 0 |
Technology Stack
Frontend
| Technology | Purpose |
|---|---|
| React 19 | UI framework |
| Vite | Build tool and dev server |
| React Router DOM | Client-side routing |
| React Bootstrap / Bootstrap 5 | UI component library and styling |
| Chart.js + react-chartjs-2 | Data visualization and charting |
| chartjs-plugin-datalabels | Chart label overlays |
| MSAL React + MSAL Browser | Microsoft Entra ID authentication |
| date-fns | Date manipulation and formatting |
| react-datepicker | Date selection component |
| react-select | Enhanced dropdown selects |
| react-toastify | Toast notifications |
| react-spinners | Loading indicators |
Backend
| Technology | Purpose |
|---|---|
| .NET 9 / ASP.NET Core | Web API framework |
| Entity Framework Core 9 | ORM and database migrations |
| PostgreSQL (via Npgsql) | Relational database |
| JWT Bearer Authentication | API security |
| Swashbuckle / Swagger | API documentation |
| Newtonsoft.Json | JSON serialization |
| Azure Key Vault | Secrets management |
| Azure Blob Storage | Structured operation logging |
| In-Memory Cache | Response caching with TTL-based invalidation |
Infrastructure
| Technology | Purpose |
|---|---|
| Docker | Containerization with multi-stage builds |
| Nginx | Frontend reverse proxy and SPA routing |
| Azure Container Apps | Cloud hosting |
| Azure Key Vault | Centralized secrets management |
| Azure Blob Storage | Append-style daily log files |
Testing
| Technology | Purpose |
|---|---|
| xUnit | Test framework |
| Testcontainers | Integration testing with real PostgreSQL instances |
CI/CD
The project uses GitHub Actions for continuous integration and deployment. A workflow is triggered on every push to the main branch and performs the following steps:
- Test -- restores .NET dependencies, pulls a PostgreSQL image, and runs the full xUnit test suite (including Testcontainers-based integration tests)
- Build -- builds Docker images for both the backend (ASP.NET Core API) and frontend (React SPA served by Nginx), tagged with the short commit hash
- Push -- pushes both images to Docker Hub
- Deploy -- authenticates with Azure and updates both Azure Container Apps (backend and frontend) to use the newly built images
This ensures that every merge to main is automatically tested, containerized, and deployed to production.
Authentication
RSTracker uses Microsoft Entra ID (formerly Azure Active Directory) for authentication.
- Users log in through a browser redirect flow via the Microsoft identity platform
- The frontend acquires an access token using MSAL (Microsoft Authentication Library) with the configured API scope
- Every API request includes the token in the
Authorization: Bearer {token}header - The backend validates the JWT against the configured Azure AD tenant and audience
- All API endpoints are protected -- unauthenticated requests receive a 401 response
Testing
The test suite uses xUnit with Testcontainers to spin up real PostgreSQL instances during integration tests, ensuring database operations are tested against actual database behavior rather than mocks.
Test coverage includes:
| Test File | Coverage |
|---|---|
| PlayerHelperTests | Player CRUD operations and data retrieval |
| RPEManagerTests | RPE calculations, weekly aggregation, volume, and intensity |
| WelnessManagerTests | Wellness scoring, weekly summaries, and mid-week averages |
Azure Blob Storage logging is mocked during tests to isolate database-focused assertions.
License
All rights reserved.
Tech Stack: JavaScript 49.4%, Python 36.6%, Shell 6.7%, Dockerfile 4.7%, CSS 1.9%, HTML 0.8%
Last Commit: 2/22/2026
Commits: 71
rugit.fun — Solana Token Creator
Create your own Solana SPL token in under two minutes, directly from your browser.
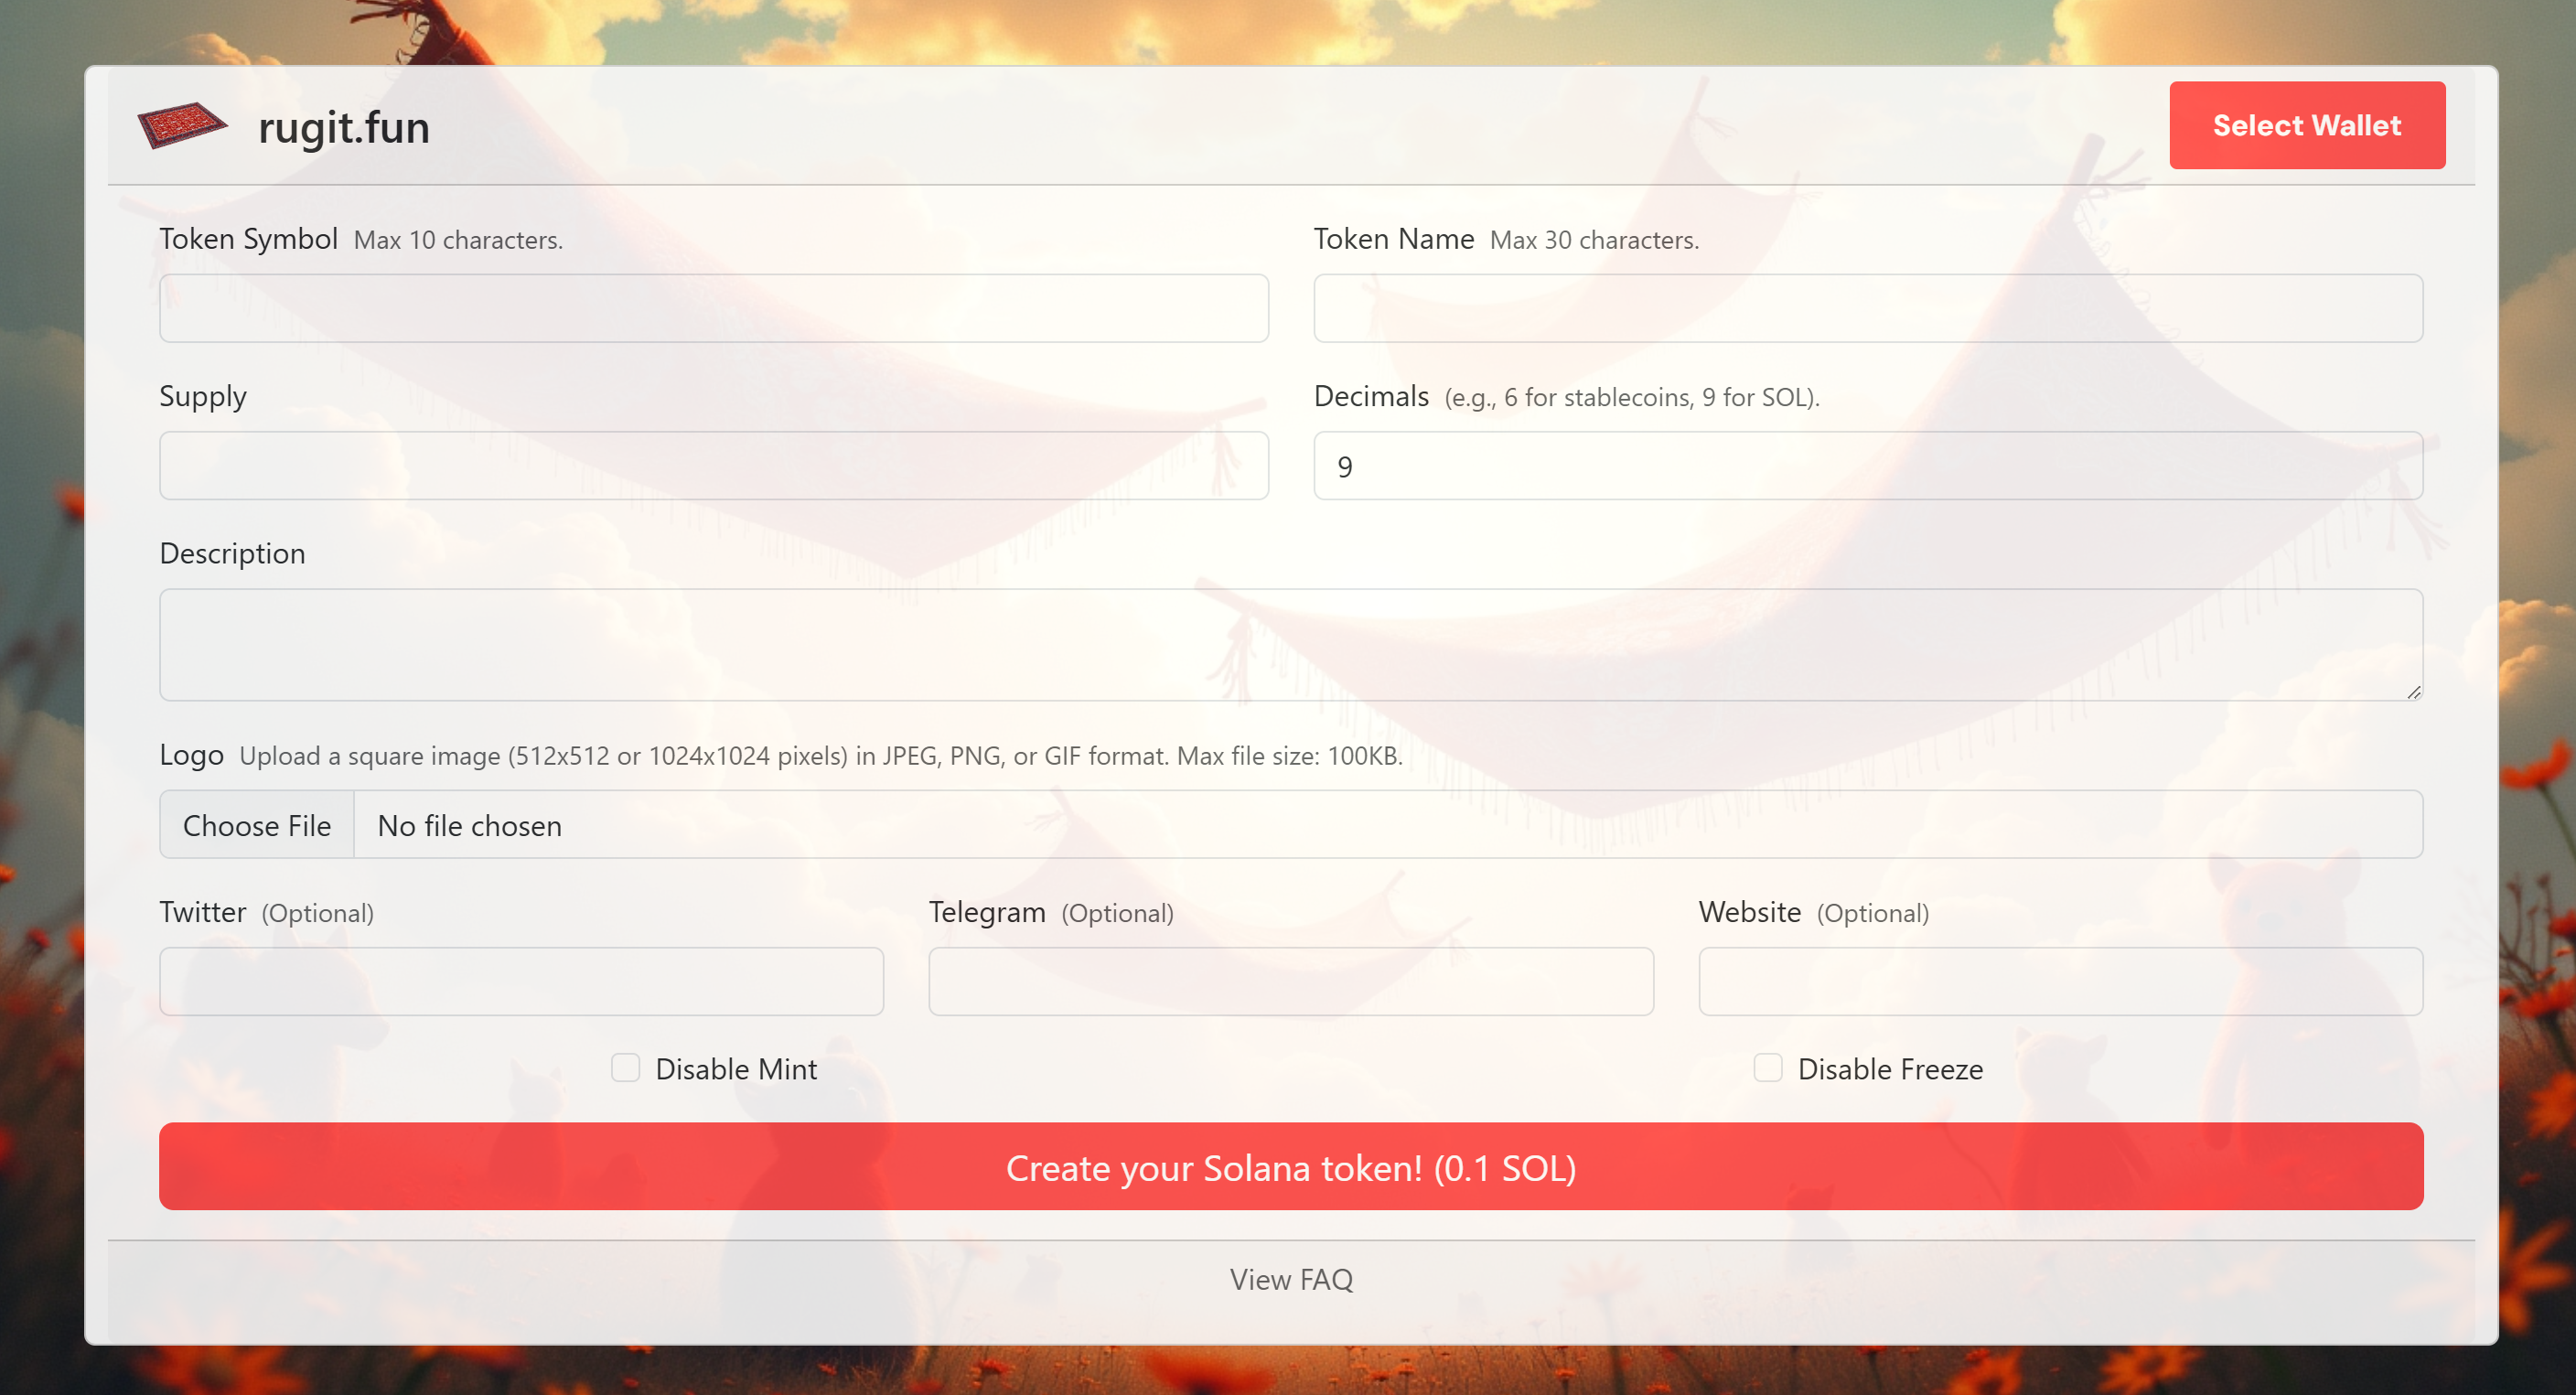
What it does
Fill in your token details, connect your Phantom wallet, and pay 0.1 SOL. The app handles everything else — uploading your logo to IPFS, minting the token on Solana mainnet, and sending it straight to your wallet.
What you can configure
- Token Symbol & Name — ticker and display name
- Supply & Decimals — total amount to mint and decimal precision
- Description & Logo — metadata attached on-chain (JPEG/PNG/GIF, 512×512 or 1024×1024, max 100 KB)
- Social links — Twitter, Telegram, Website (optional)
- Disable Mint — permanently remove the ability to mint more tokens
- Disable Freeze — permanently remove freeze authority
Requirements
- Phantom wallet browser extension
- 0.1 SOL + a small network fee
How it works under the hood
-
Payment & validation — after you sign the transaction, the backend verifies it on-chain via the Solana RPC. It checks that the transaction is confirmed, less than 5 minutes old, and that the payment went to the correct recipient address. If the RPC is slow, it retries up to 10 times before giving up.
-
IPFS upload — your logo and a metadata JSON file are uploaded to Pinata. The metadata URI is what gets attached to the token on-chain.
-
Token minting — the backend runs the Solana CLI and spl-token CLI to create the token with the Token-2022 program (
TokenzQdBNbLqP5VEhdkAS6EPFLC1PHnBqCXEpPxuEb), initialize on-chain metadata, mint the supply, and transfer it to your wallet. Each CLI command is retried up to 5 times on failure. -
Cleanup — temporary files are deleted after minting. IPFS pins and logs older than 1 hour are automatically purged by a background cleanup job.
Tech stack
| Layer | Tech |
|---|---|
| Frontend | React 19, Vite, React-Bootstrap |
| Wallet | @solana/wallet-adapter (Phantom only) |
| Blockchain | Solana mainnet via QuickNode RPC |
| Backend | FastAPI (Python), Uvicorn |
| IPFS | Pinata |
| Minting | Solana CLI + spl-token CLI (Token-2022) |
| Logging | Azure Files |
| Hosting | Azure Container Apps (backend) |